How to Build and Edit an Offer in Products
In this article, you will learn how to build and edit an offer in a membership.
Step 1: Create your offer
- Navigate to Your Products
- Hover over the Courses section and select ‘Offers’.
- Click on the ‘+Create Offer’ button on the top right corner.

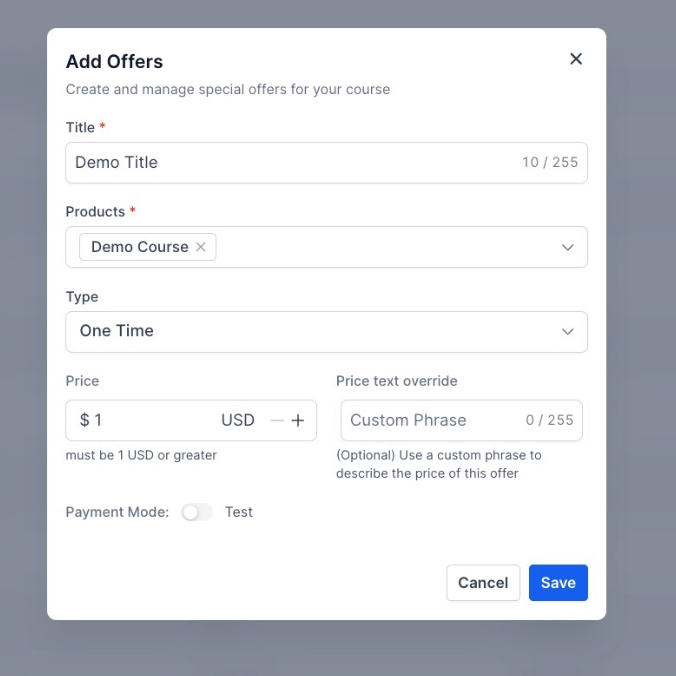
- Give a title to this offer, connect it with a product, and give it a price. All offers linked to the product will show in the offer tab on the membership products page.
- Select the type of offer it is, and mention the Price Text Override
- Leave this with the toggle on Live if you plan to collect real payments
- Save
Step 2: Build your membership
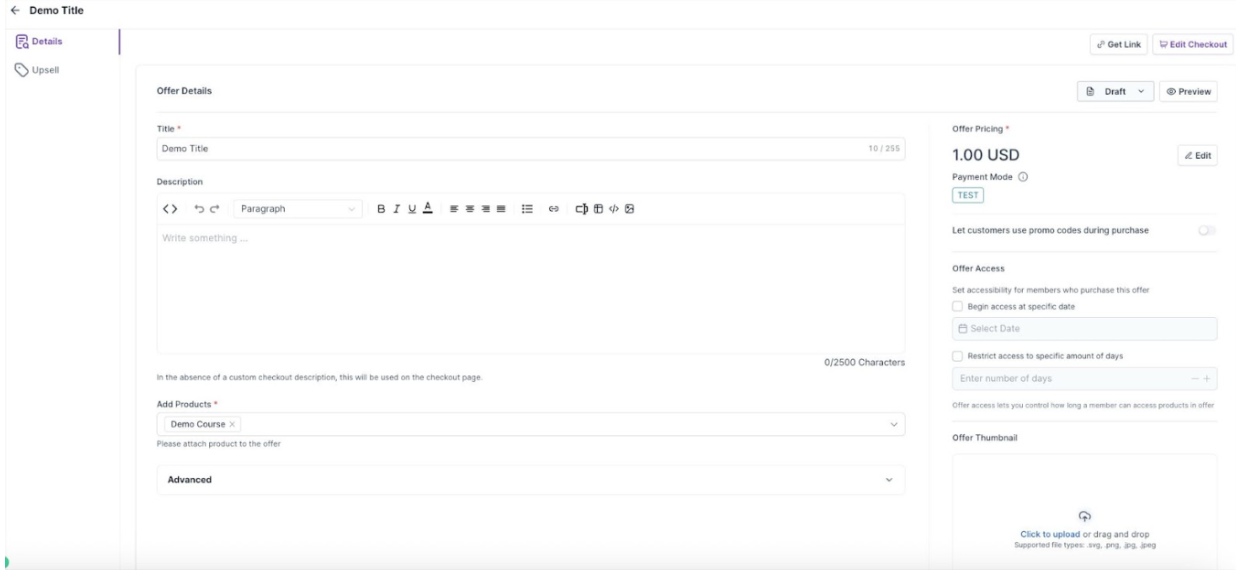
- Edit the title if needed
- Add a description
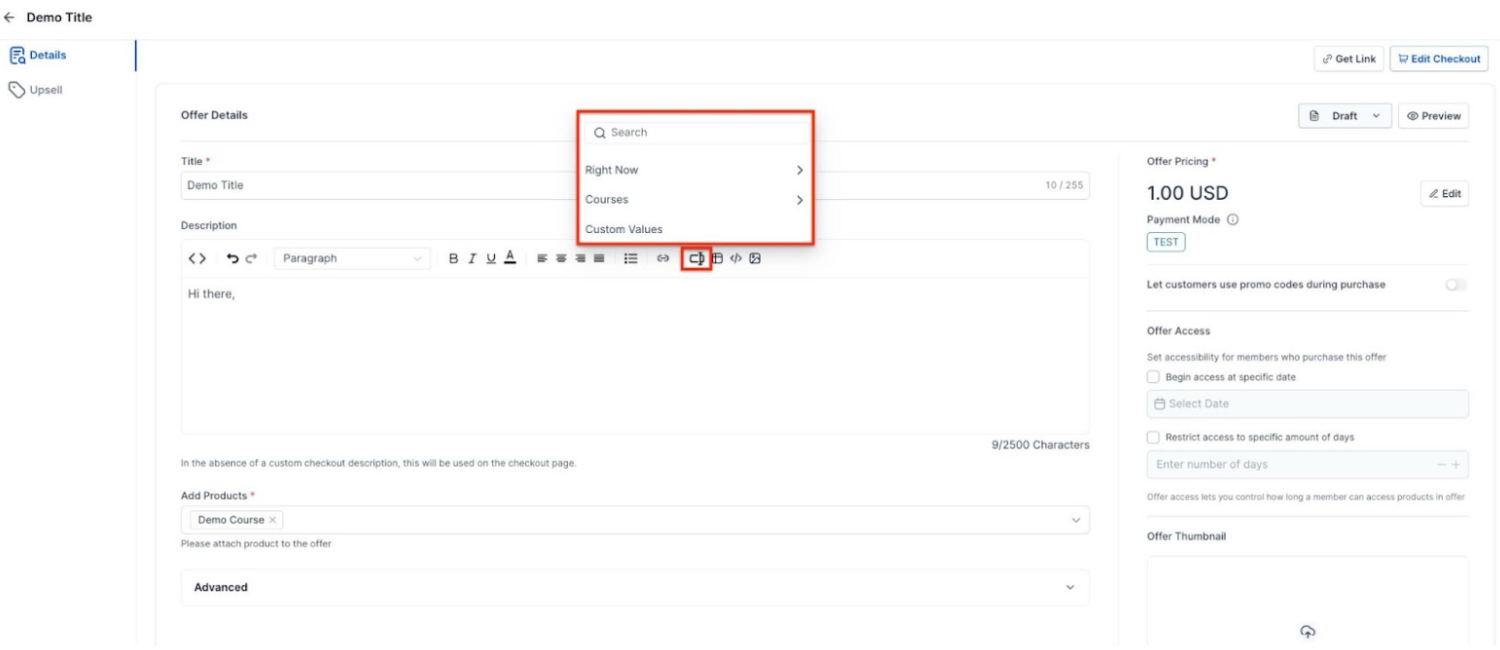
- You can also add custom values to elevate personalization capabilities, including contact-specific, time-based, course-specific, and location-specific options. These custom values can be seamlessly applied to post descriptions, offers, offer descriptions, and quizzes, enabling businesses to deliver tailored experiences with ease.
- In case you need to, you can add custom JS, CSS, and/or tracking code.
- Make sure you have selected the proper product (or products)
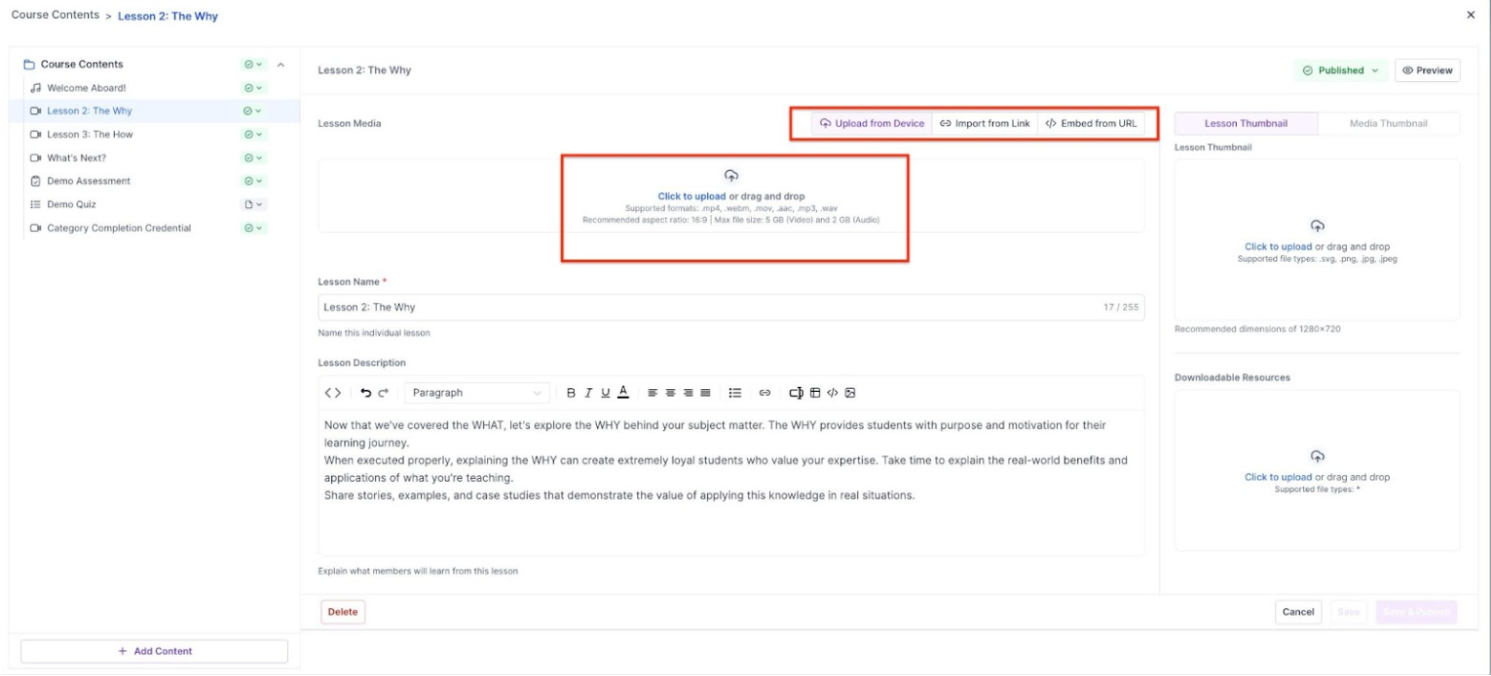
- Add Media via Links: If you would like to add media to your offer, you can embed audio or video content directly into lessons by providing downloadable URLs, enhancing the learning experience.
- On the section on the right, you can set this to draft or published
- Edit the price (if it's free, a one-time payment, or a recurring subscription)
- Add the image that will be displayed next to your course
- Save.
Step 3: Preview your membership
- Click the preview link to see what your offer would look like
- If you want to share your page with others, click on the Get Link text to grab a copy of the URL
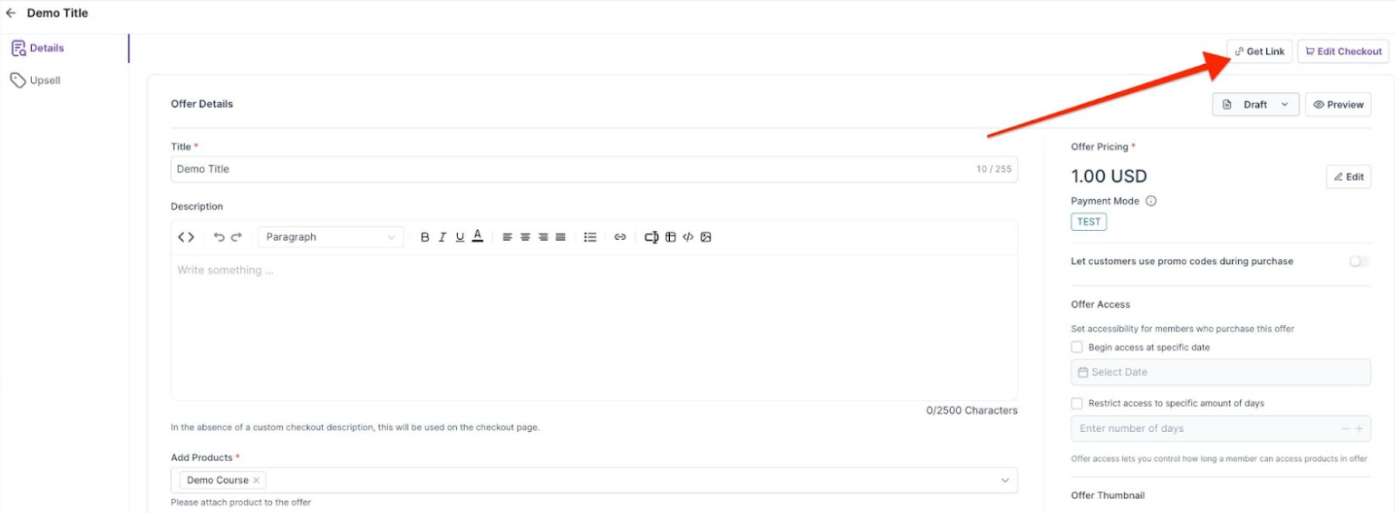
Note: In preview mode, the Track Progress and Mark as Complete features won't work since you view everything from a preview perspective. To test this, you will need to create a test contact, give yourself the offer, and access the membership as if you were a regular customer
Step 4: Complete the Setup and View your Course
- When you finish editing the checkout page, click on save
- Navigate back to offers and see what you created.
Offer Duration: Set an Expiry Date or Start Date for Your Offer
Course creators can set a fixed access period for members starting from their sign-up date. This functionality enables access for specific durations, such as 6 months, 2 months, 1 week, or even a single day. When this period ends, access is automatically revoked, making membership management easier and providing clear, time-limited access. Additionally, creators can set a start date for access, ensuring that offers activate on a predetermined date.
Setting Up Access Duration
Step 1: Define Offer Access Validity Duration
- Navigate to the Offer Setup: Select the offer you want to modify or create a new offer.
- Access Duration Settings: In the offer details page, find the section labeled "Offer Access," and check the box "Restrict access to a specific amount of days."
- Specify Validity Duration: Enter the desired access period in days. For example, for 6 months, enter 180 days; for 2 months, enter 60 days; for 1 week, enter 7 days; and for 1 day, enter 1.
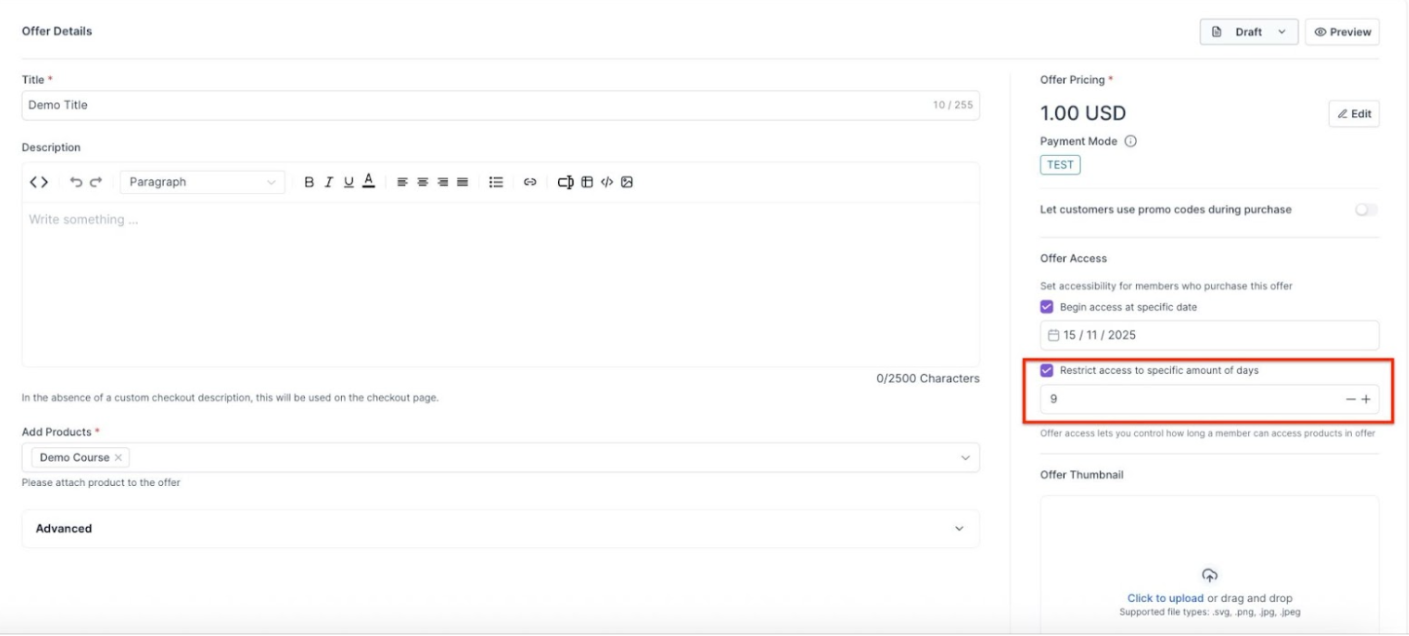
Step 2: Save and Apply
- Confirm Settings: Review the access duration to ensure it is correct.
- Save Changes: Save your changes. This duration will now apply to the offer from the member's sign-up date. Be sure to publish your offer after saving.
How It Works
- Automatic Revocation: When the specified access period ends, the system will automatically revoke the member's access to the course content.
Specify a Start Date for Access
Step 1: Define Offer Start Date
- Navigate to the Offer Setup: Select the offer you want to modify or create a new offer.
- Offer Access Begin Date: In the offer details page, find the section labeled "Offer Access," and check the box "Begin access at a specific date."
- Enter Date: Enter the desired start date. The offer will become active on this date.
This feature is ideal for product launches and pre-sales, as it allows you to control when members can start accessing your content.
How It Works
- Pre-Start Visibility: If users sign up before the start date, they will see the course page but won't be able to access any lessons or content until the start date. They will only see the overview page.
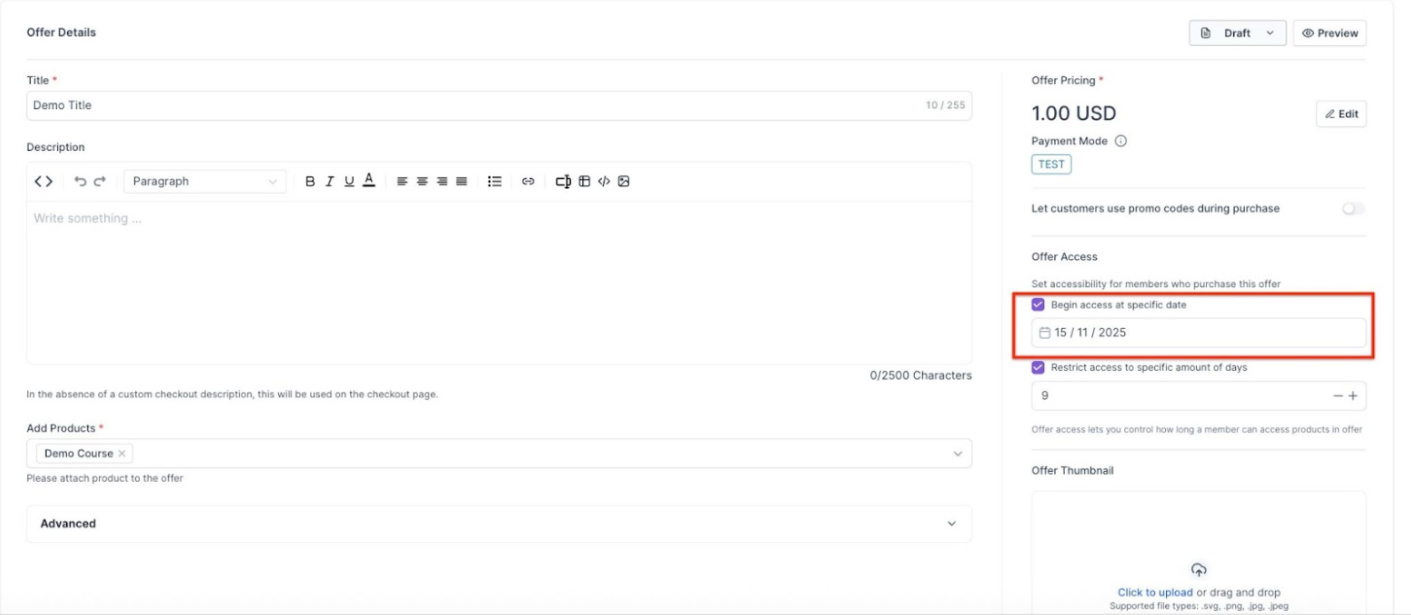
NOTE: Course creators can choose to set either the start date or expiry date or combine both.
FAQs
Q1: What happens if a learner already has an active subscription or purchases an additional offer for the same course?
- The system will merge the new offer's validity period with their existing access, ensuring uninterrupted access based on the latest purchase.
Q2: What happens when a member upgrades or changes to another offer for the same course?
- The member's access to the course will be extended according to the new offer's validity period. The new offer's validity takes precedence, ensuring members get the best possible access terms.
Q3: Can I add custom values in memberships?
- Yes, custom values can be used in memberships for personalizing post descriptions, offers, offer descriptions and quizzes.
