Calendar Setup 101
Managing time and appointments efficiently can greatly influence your success, be it personal or professional. With Mastermind 's advanced calendar features, you are empowered with versatile tools to set up, customize, and handle your schedules. This guide covers every facet of calendar management, ensuring you won't miss a beat.
Calendar Varieties in Mastermind:
- Personal Calendar: Allows users to set up a personal 1:1 booking calendar, simplifying the process by eliminating the need for a complex multi-user configuration.
- Simple (Unassigned/Event Calendar): Ideal for general events that don't require specific assignees.
- Round Robin (Group Calendar): Distributes appointments evenly among team members, ensuring a balanced workload and availability.
- Class Booking: Tailored for single-session classes, workshops, or seminars.
- Collective Booking: Events where the presence of multiple team members is mandatory.
- Service Calendar: Tailored for creating services, grouping them by categories, and displaying them in a single scheduling link - the service menu.

Important note for Personal Booking Calendar:
- By default, the calendar creator is automatically assigned as the team member, but this setting can be adjusted if needed.
- The Personal Calendar includes all the same features as the Round Robin Calendar, but is limited to a single team member, whereas Round Robin allows multiple team members to be assigned.
The Blueprint of Setting Up Your Calendar:
Getting Started:
- Navigate to Calendars in the Settings menu.
- Click on Create Calendar.
- Specify your desired calendar type and fill in the details.


Note:
Auto-Slug Generation: A unique slug is automatically created based on the calendar name during setup.
Designing Your Calendar:
- Logo: Enhance brand visibility by uploading an appropriate logo.
- Name: Provide a suitable name.
- Description: Give a concise overview.
- URL: Customize your calendar link for easy sharing.
- Appointment Title: Set a meaningful title. Utilize {{contact.name}} for personalized touches.
- Meeting Location: Allows users to specify where a meeting will take place when setting up appointments through a calendar system.
- Event Color: Designate a color for quick identification.

Important features within the Meeting Details Tab:
- Keeping your meeting location private
The "Display Label for Custom Location" in Meeting details allows you to show a placeholder name, like "New York Office," on the booking widget, keeping the actual meeting location private until the booking is confirmed.

- Accommodating Your Customer’s Convenience
The "Ask the Booker" feature lets the booker specify their preferred meeting location, enhancing the booking experience by accommodating their convenience.


To utilize these features, navigate to your calendar settings, add a location, and configure either a custom label or select the "Ask the Booker" option.
Configuring Availability:
- Weekly Working Hours: Set your regular, weekly working hours. This is useful for setting up your default schedule that repeats week after week.
- Date Specific Hours: Adjust your schedule for specific dates. Override your regular weekly hours.
- Booking Widget to Open First Available Date: Bookers can see and select the earliest available slot immediately, eliminating the need for manual searching. This is beneficial for businesses looking to accept early bookings for future events, such as special holidays or seasonal offers.
- To use this feature, configure Date-Specific Hours without setting Weekly Working Hours. Ensure no recurring weekly hours are configured for this feature to function correctly.

- Duration & Interval: Set the time frame for meetings and the frequency of their occurrence.
- Buffer Time: Allow a cool-down period between appointments.
- Pre Buffer: Additional Time added before an appointment.
- Post Buffer: Additional Time added after an appointment.
- If a 30-minute appointment has a 30-minute pre-buffer and post-buffer, and a slot is booked from 12:00 PM to 12:30 PM, the next available slot would be 1:00 PM. This ensures the buffer times before and after the appointment are respected.
- Max Bookings: Define daily appointment limits.
- Scheduling Protocols: Dictate prior notice and lead time requirements.
- Office Hours: Define your general availability or specify it for unique dates.
- Recurring Appointments: Choose the rhythm of repeated sessions.

Availability Type Selection
- Standard Availability: Ideal for routine appointments with fixed hours.
- Date-Specific Hours: Perfect for unique timeframes, such as webinars or one-off events.
Delving into Availability Settings
- Meeting Duration: Designate the length of your appointments (e.g., 30 minutes, 1 hour).
- Meeting Interval: Specify how often appointments can be scheduled.
- Pre-Buffer & Post-Buffer time: It ensures that pre and post-buffers for appointments do not overlap with blocked slots, providing appropriate buffer times. Input a downtime period between bookings. For instance, if a 30-minute appointment with a 30-minute interval & 30-minute pre and post-buffers were set, and a slot from 12:00 PM to 12:30 PM was blocked, the next available slot would be 1:00 PM, accommodating the required 30-minute pre-buffer. The previous available slot would be 11:00 AM, considering 11:00 AM to 11:30 AM as the duration and 11:30 AM to 12:00 PM as the required post-buffer.
- Max Bookings Per Slot: Define the upper limit of appointments for each time slot. In cases where the set threshold is exceeded, the system moves on to the next user in the round-robin or marks the slot as unavailable.
- Max Bookings Per Day: Set a ceiling for the total number of appointments on this calendar daily.
Scheduling Notice & Date Range Configuration
- Minimum Scheduling Notice: Choose the lead time required before an appointment.
- Date Range: Define how far ahead appointments can be scheduled.
Important features within the Availability Tab:
Viewing Calendars and Appointments in User's Time Zone
Allows users to view calendar appointments in their time zone, simplifying scheduling across different regions. Appointments display in the user's time zone both in the calendar view and appointment list, reducing the need for manual time conversions.
To Use
- Set your time zone under profile settings
- Appointments will automatically reflect it.

Look Busy
- The "Look Busy" feature is designed to create urgency by hiding a percentage of your available booking slots, making you appear more in demand.
- By limiting visible time slots, potential clients may feel a greater need to book quickly, which can lead to increased bookings.
How to use: To use this feature, simply navigate to your calendar settings> edit the calendar and enable "Look Busy," and set the percentage of slots to hide.


This feature applies to:
- Event calendars
- Round-robin calendars
- Collective calendars
- Service calendars
Handling Recurring Appointments
Toggle to enable or disable regular meetings. Define the frequency, count, and measures to undertake when slots are unavailable. Define how often the appointments repeat (e.g., weekly, monthly) and decide what happens when time slots become unavailable.

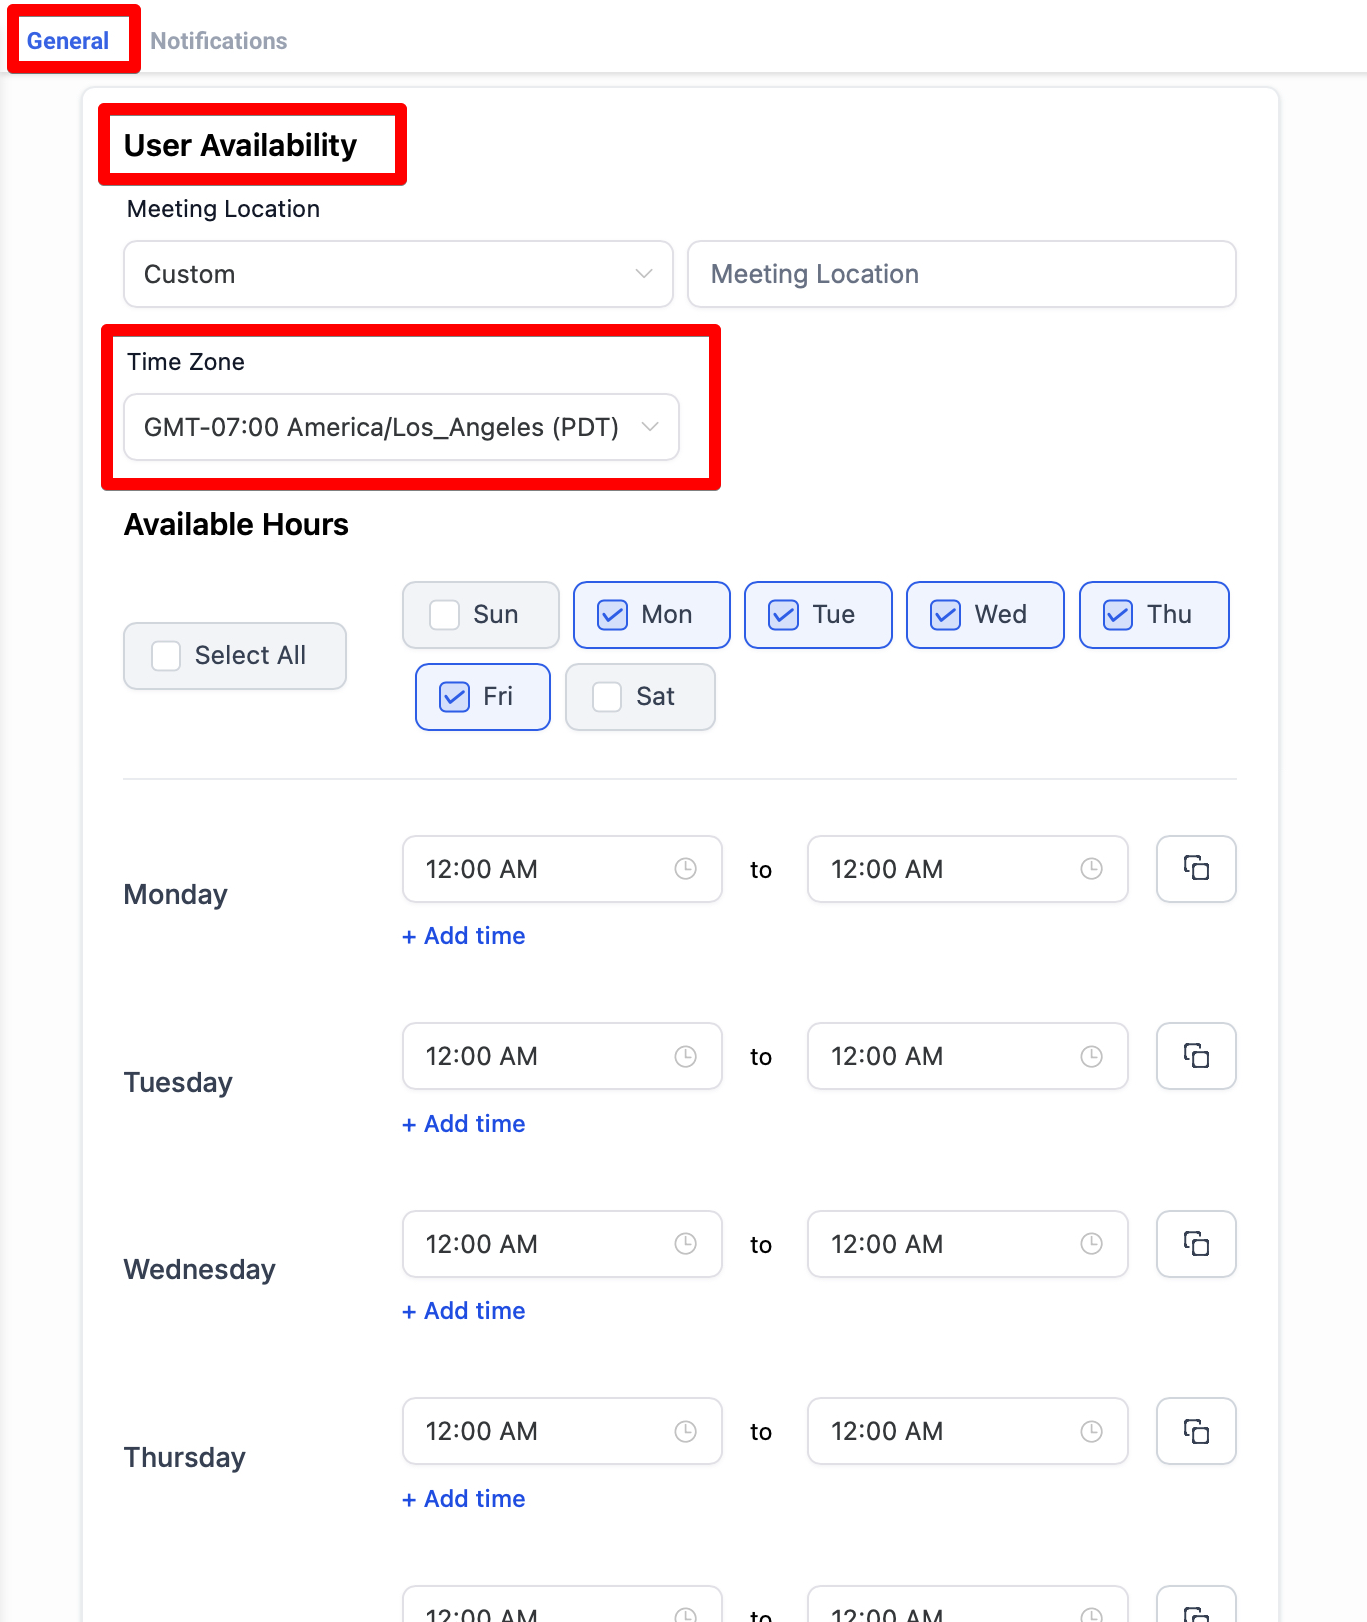
Office Hours Configuration
For Standard Availability:
- Select Days: Blue signifies selected days with checkmarks, while Gray indicates unselected ones.
- Adding Extra Hours: Click on "+ Hours" to append more hours on specific days.
- Applying Hours: Use "Apply All" to replicate the hours across all selected days.
- Recurring appointments can also be fine-tuned in this section.
For Date Specific Hours:
Determine distinct dates and times apt for special events or one-time sessions.
Click "Save & Continue" once you've tailored your settings.
Important Note:
When your timezone differs from the company's, particularly for event calendars, ensure your availability mirrors your timezone rather than the company's. For instance, if you're active from 8am-5pm PST and the company operates in EST, adjust your availability to 11pm-8pm EST for accurate reflections.
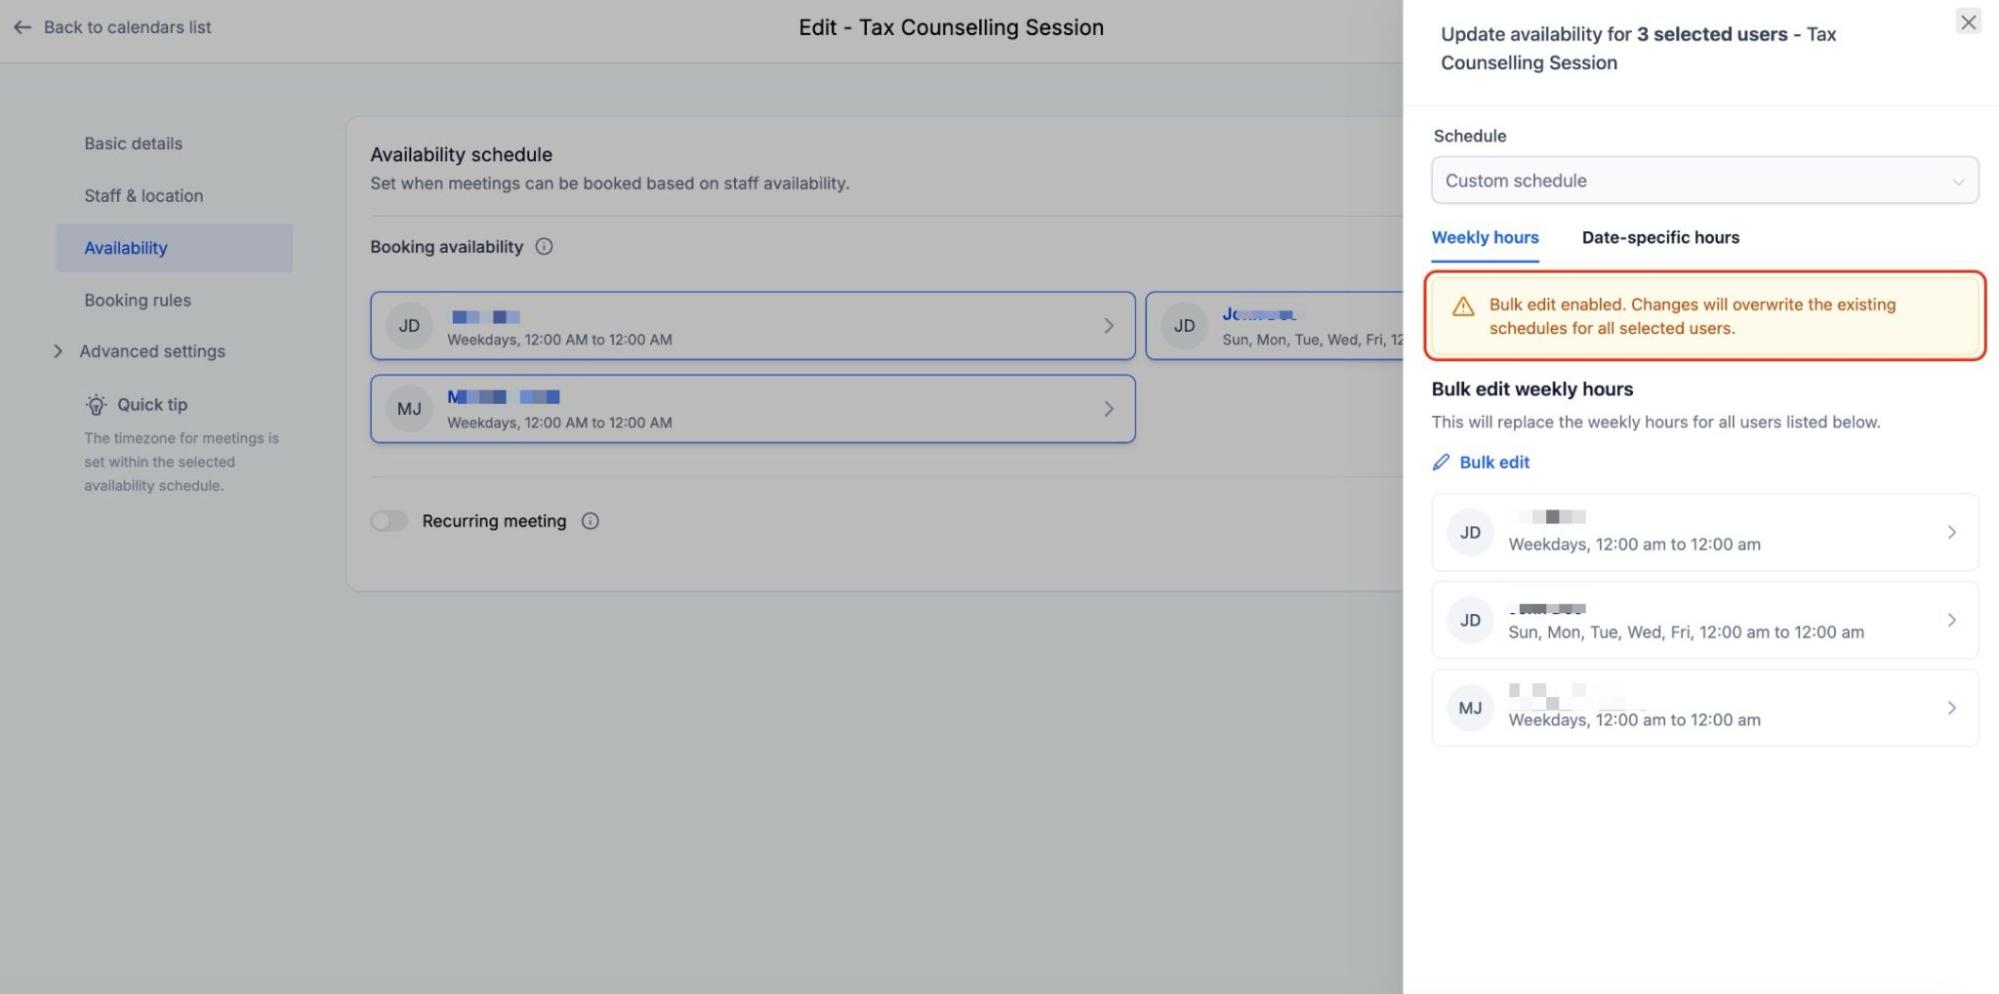
Specialized Bulk Editing
When managing multi-user calendars, you can use the Bulk Edit feature to update schedules for several team members at once. This includes:
- Clear Impact Warnings: A banner will notify you when editing Weekly Hours in bulk, confirming that the changes will apply to every selected user.
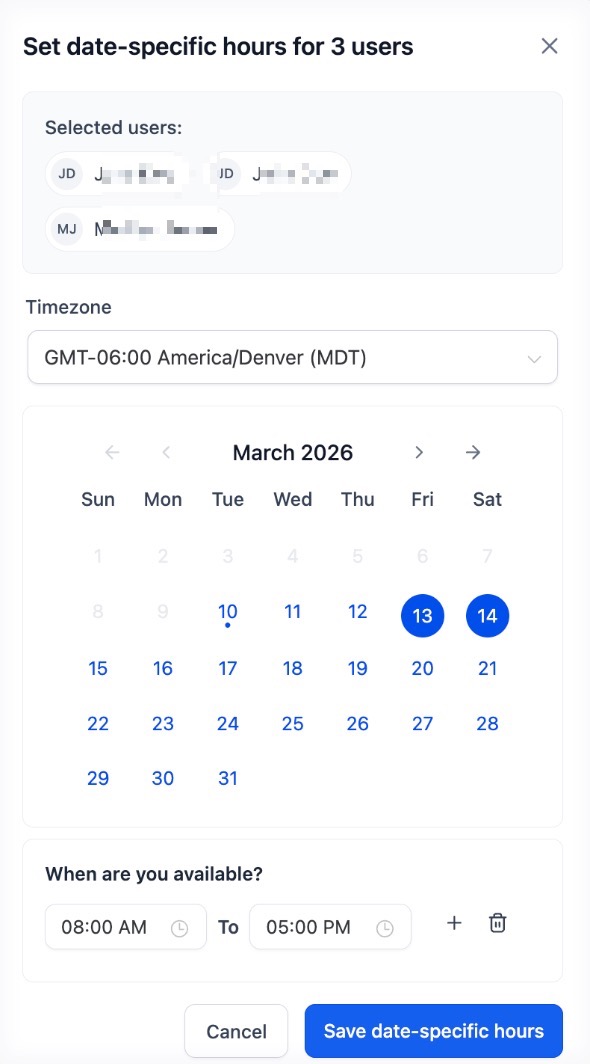
- Structured Date-Specific Overviews: View exceptions grouped by date. You can see how many users are available on a specific day, view individual time blocks, and edit or delete entries for specific users within that date.
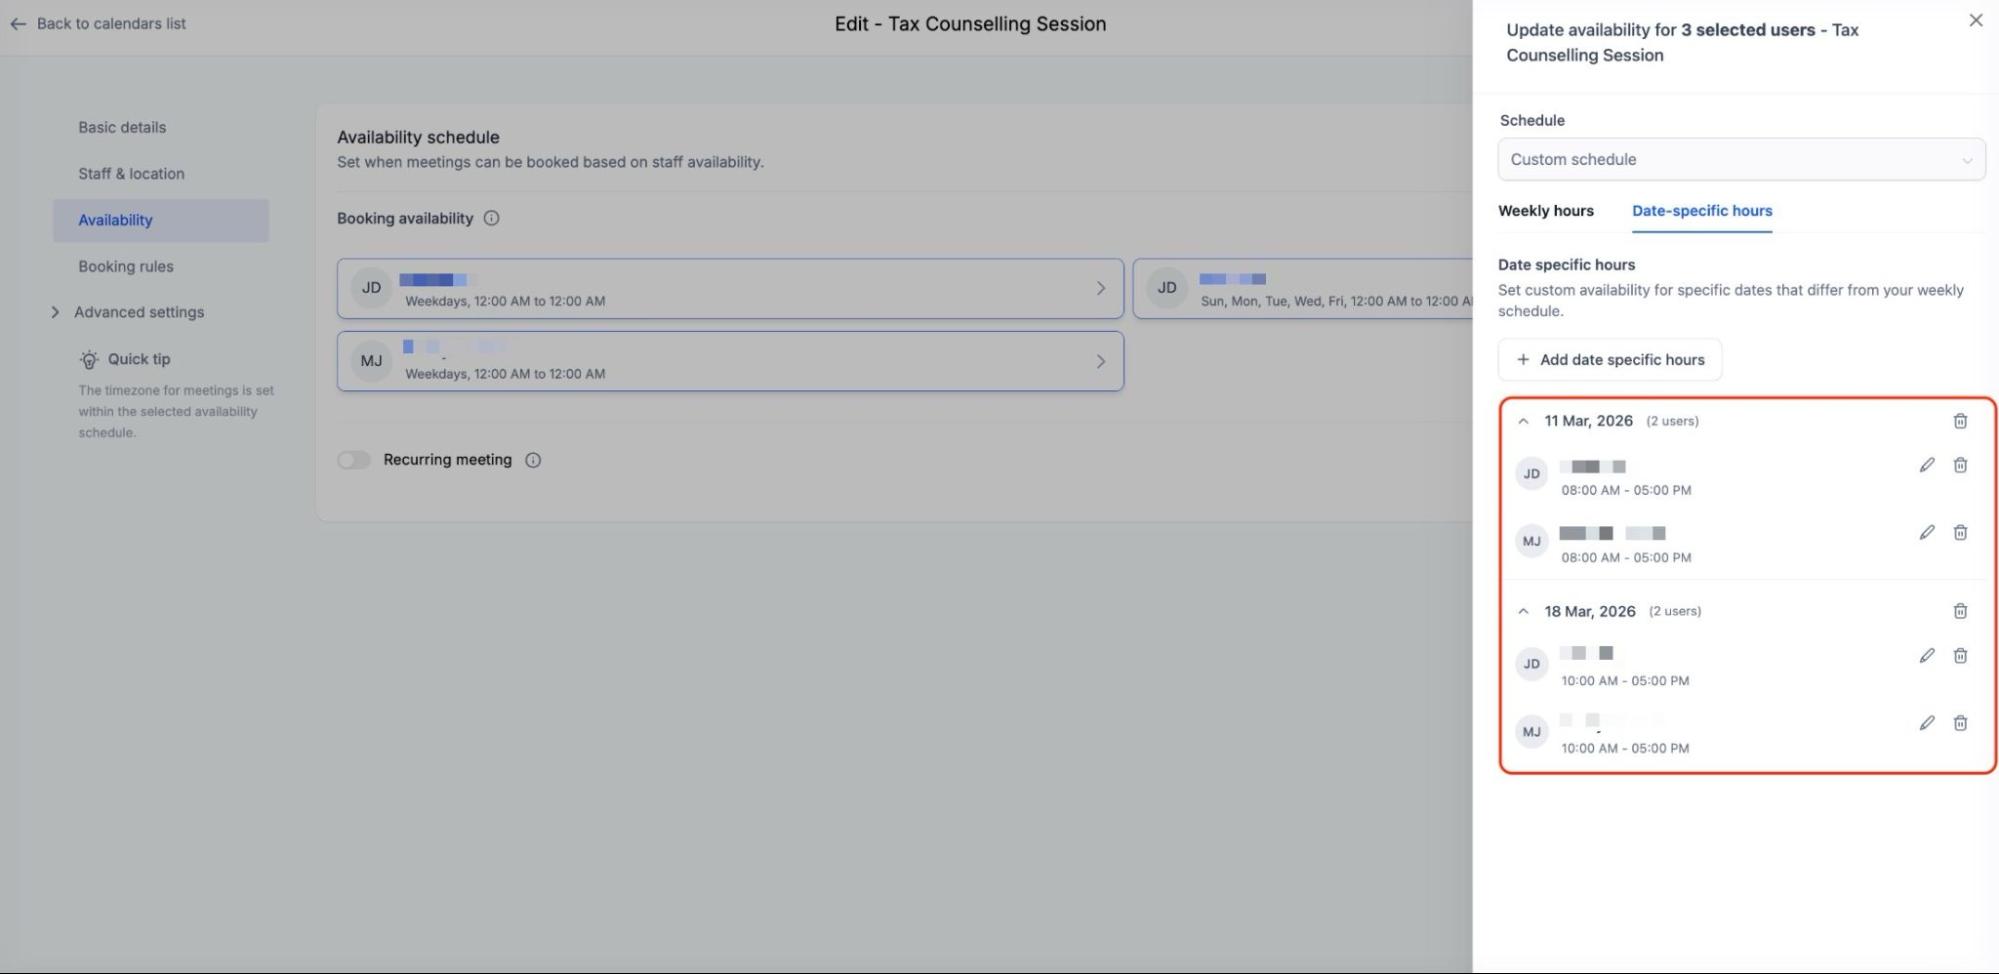
- Bulk Add Exceptions: When adding new date-specific hours in bulk, the time block is applied to all selected users simultaneously, though they can be edited individually later.
- Section-Specific Saving: To prevent accidental data loss, saving changes in the
- Weekly Hours section only updates weekly schedules, while saving in the
- Date-Specific section only updates exceptions.
Forms, Payments, and Guest Inclusions:
- Use a default or curated form for the booking widget.

- Pre-Populate Fields: Enable the system to recall previous attendees with the Pre-populate fields(sticky contacts) toggle to remember your contact information.

- Consent Checkbox: Toggle this option to allow obtaining consent from contacts when they provide their phone number during the appointment booking process.

- Add Guests: Allow main participants to bring in additional guests, streamlining group schedules. Check the Require Guests for Booking to make at least one guest mandatory.

- Name and mailing address: Include the data of the guest to be able to attend.
Note: In many cases, attendees are required to fill in the information before the appointment so that service providers can use that information for the appointment. An example can be a Medical Appointment: This could be allergies, any genetic ailments, past medical issues, etc.
- Count Option for Adding Guests: This is particularly useful in cases where the primary attendee may not have the email addresses of the guests, but still wants them added to the appointment.
- Pixel ID Tracking: Seamlessly incorporate scheduling into your analytic journey.
- Auto-confirm New Meetings: Activate this feature to instantly confirm new appointments on available calendar slots, ensuring users receive immediate booking confirmations.
- Billing Integration: If charging, integrate with reliable payment gateways like Stripe and turn on the accept payments feature, fill out the price and description.

- Accept Partial Payment: Enable partial payments by toggling the "Accept Partial Payment" option if you want to charge the clients partially. Specify the deposit amount or percentage required during the appointment booking process.

- Collect Payment for all attendees: Enable this option to charge based on the total number of guests. The payment amount will be multiplied by the total number of attendees, and the booker will be charged accordingly via the booking widget.

- Stripe Payment Gateway: Seamlessly bill for appointments by integrating with Stripe. Key configurations include setting the amount, deciding the currency, selecting between Test/Live environments, and customizing charge descriptions.
Coupon Codes in Calendar Bookings: You can offer discounts at checkout by allowing customers to enter coupon codes. These codes can be either fixed or percentage-based, with restrictions like usage limits and specific dates. It's a great way to run promotions or reward loyal customers.

Custom Notifications & Management
Notification Types:
Determine your desired acknowledgment, be it a simple appointment confirmation or an update.
Decide who gets notified: the contact, an assigned user (especially for round-robin calendars), specific emails, or additional phone numbers.
You can choose between Email, In-App, and SMS notifications. You can choose between custom email or SMS templates. You can customize it, select an existing template from your account, or create a new one.

Google Calendar Integration
- Permit Google Calendar to send appointment invitations or update emails to attendees.
- Assign contacts to their respective calendar team members upon appointment booking.
Booking Features:
- Facilitate flexibility with options for clients to both reschedule or cancel.
- Include additional notes that provide links to reschedule, cancel, and any other relevant information such as the client’s phone number and email address.

- When you move on to rescheduling and cancellation, you can also set time limits on when appointments can be rescheduled or canceled, helping to minimize last-minute changes that disrupt schedules and waste valuable time.
- To enable and configure this feature, go to your calendar settings, navigate to notifications and additional options, and scroll down to the cancellation and reschedule policy section. You can set specific time restrictions before an appointment to prevent last-minute changes.

Note: It’s important to communicate these policies to your customers, such as including them in the meeting details or booking confirmation messages, to ensure transparency and avoid misunderstandings.
- After the appointment has been rescheduled, a "Rescheduled" tag will appear in both the appointment list view and appointment modal. It will also display the previous date and time for easy reference. To use, simply review your appointment list or details to see any marked rescheduled appointments.


Connection to Other Calendars
- Link your Mastermind calendar to an existing one or navigate to set this up as per your needs.
- Please Note: The menu shown in this screenshot is only for simple calendars

Widget Customization & Appearance
- Style Selection: Opt between the contemporary Neo or the classic design for your widget.
- Primary Color: Select the color for buttons, dates, time slots, and actions
- Background color: Set the background color for the date and time slots and the form.
- Button Text: Add the text that you want to display on the scheduling button.
- Calendar Title: Toggle on the calendar title to display the name of the calendar
- Calendar Description: Toggle on the calendar description to display the description of the calendar.
- Calendar Details: Includes information such as duration, date & time, recurring details and timezone
Customization
You can insert the custom css code to customize the calendar in your desired way.
Staff Selection:
Allow staff selection during bookings, letting contacts choose which user or staff member they'd like to schedule with.

Management & Oversight
Viewing & Editing Your Calendar:
- Access all saved calendars in your account settings.
- Utilize the '...' option to: duplicate, retrieve the embed code, share scheduling or permanent links, edit calendar settings, activate/deactivate, or even delete from your account. You can also move calendars to specific groups if needed.
Appointment Management:
- Head over to Calendars > Appointments to sift through appointments based on the Calendar, Status, and Date.
- Make the most of manual appointment booking when required.

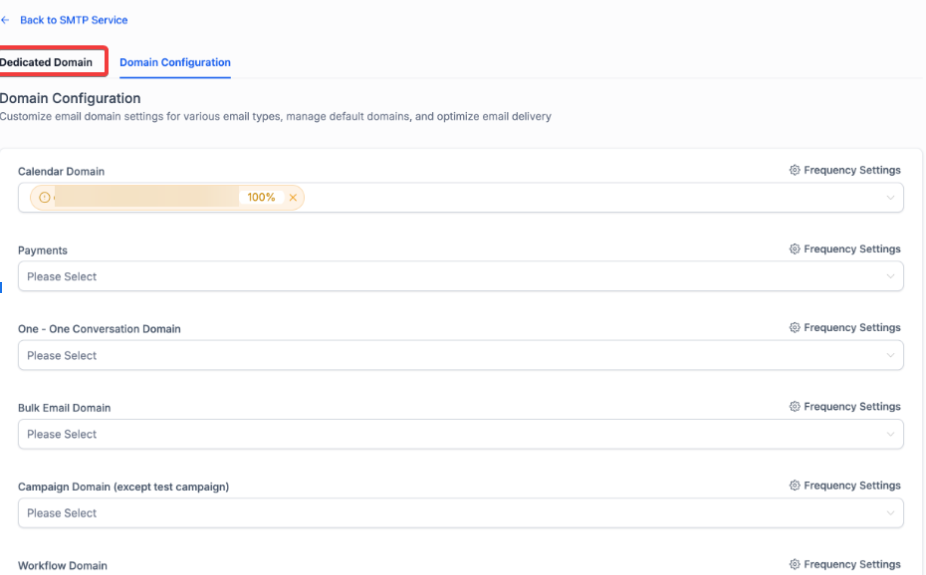
Calendar Communications with Dedicated Sending Domains
Dedicated sending domains can be set for calendar emails like confirmations, reminders, and reschedules. This helps improve deliverability and protect the domain reputation by separating calendar traffic. Users can distribute email volume across multiple domains with custom percentage settings.
To activate, go to Settings → Email services → Dedicated domain and IP → Domain configuration. Assign domains to the calendar category, and set distribution preferences.
FAQs
Q1: How can I create a new calendar in Mastermind?
A: To create a new calendar, navigate to the "Calendars" section in the Settings menu, click "Create Calendar," and select your desired calendar type. You can then customize it with options like name, URL, and meeting location.
Q2: How can I keep the meeting location private when booking appointments?
A: Use the "Display Label for Custom Location" feature in the meeting details section. This allows you to show a placeholder, such as "New York Office," which keeps the actual meeting location private until the booking is confirmed.
Q3: What is the "Look Busy" feature, and how does it work?
A: The "Look Busy" feature hides a percentage of your available booking slots to create a sense of urgency. It randomizes hidden slots across different days to make your calendar appear busier, encouraging clients to book quickly.
Q4: How do pre and post-buffers work in appointment scheduling?
A: Pre and post-buffers add extra time before and after an appointment to avoid overlap. For example, if you set a 30-minute buffer, the next available appointment time will be adjusted to accommodate that buffer, ensuring proper downtime.
Q5: Can I add multiple guests to a single appointment?
A: Yes, with the "Add Guests" feature, you can allow the primary attendee to invite additional guests to an appointment. You can set the maximum number of guests and notify them just like the main participant.
Q6: How do I integrate payments for appointments?
A: You can integrate payments using a gateway like Stripe. Go to the billing section in your calendar settings and set up pricing. You can also enable partial payments and define the amount or percentage to charge upfront.
Q7: Can clients reschedule or cancel their appointments?
A: Yes, clients can reschedule or cancel appointments. You can configure rescheduling and cancellation options in your calendar settings, including setting limits on how soon before the appointment these actions can be made.
Q8: How do I synchronize my Mastermind calendar with external calendars like Google?
A: You can link your Mastermind calendar with external calendars, such as Google Calendar, to sync appointments and ensure seamless scheduling across platforms. Enable this in the calendar integration settings.
Q9: How can I customize the appearance of my booking widget?
A: You can customize the widget’s design by choosing between Neo and Classic styles, setting colors for buttons and backgrounds, and editing text for the scheduling button. These options can be configured in the widget customization settings.
Q10: How can I limit the number of appointments per day or time slot?
A: You can set a maximum number of appointments per time slot and per day in your availability settings. If the limit is reached, the system will automatically move on to the next available time or mark the slot as unavailable.
Q11: Where will the discount show?
A:It appears during booking and in the appointment’s payment details.
Q12: How can I ensure my appointments show in the correct time zone for both myself and my clients?
A: You can set your time zone under your profile settings to ensure appointments are displayed in your local time zone. This is especially helpful for scheduling across different regions, as appointments will automatically adjust to reflect your personal time zone.
Q13: What are "Date-Specific Hours" and when should I use them?
A: Use these when your schedule changes for just one day. For example, if you normally work every Monday from 9 to 5, but next Monday you are leaving at noon, you can use "Date-Specific Hours" to change only that one Monday without messing up your permanent weekly schedule.