How to Create a Service Calendar
A Service Calendar is a specialized calendar format designed to streamline the booking process for businesses that offer various services. This calendar allows the integration of different services, categorizing them into groups and showcasing them all under one cohesive scheduling link, known as the Service Menu.
These calendars integrate seamlessly with staff availability. You can assign services to specific team members, set service durations, and even process payments during the booking process.
How to Set Up a Service Calendar
Step 1: Initiate Calendar Configuration
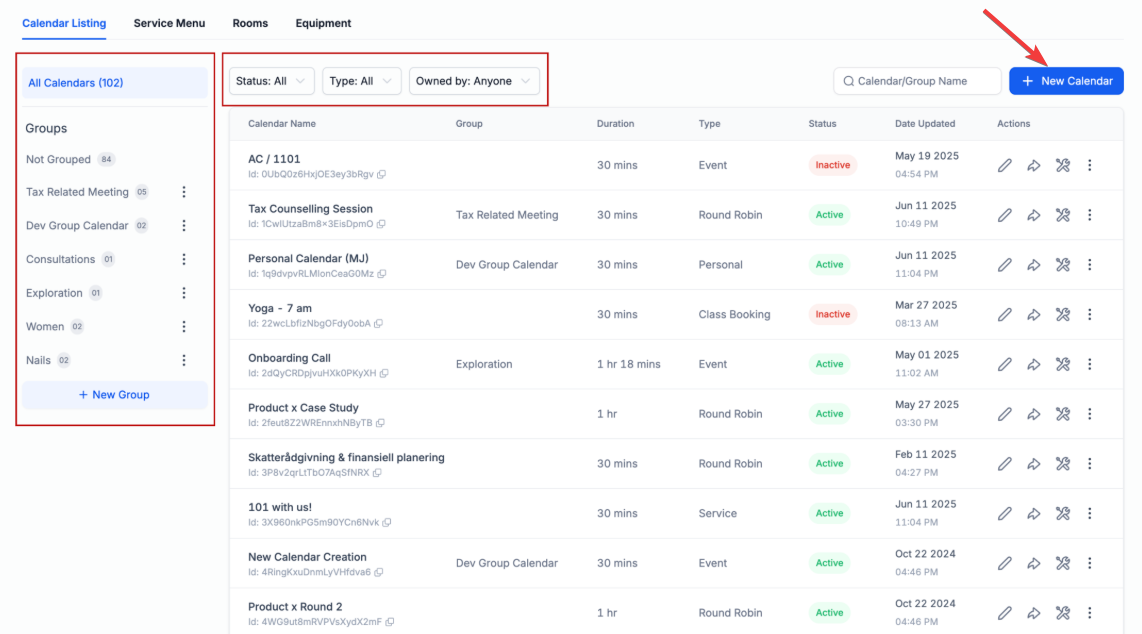
- Log in to your account, navigate to the Calendars section, and select Calendar Settings.
-
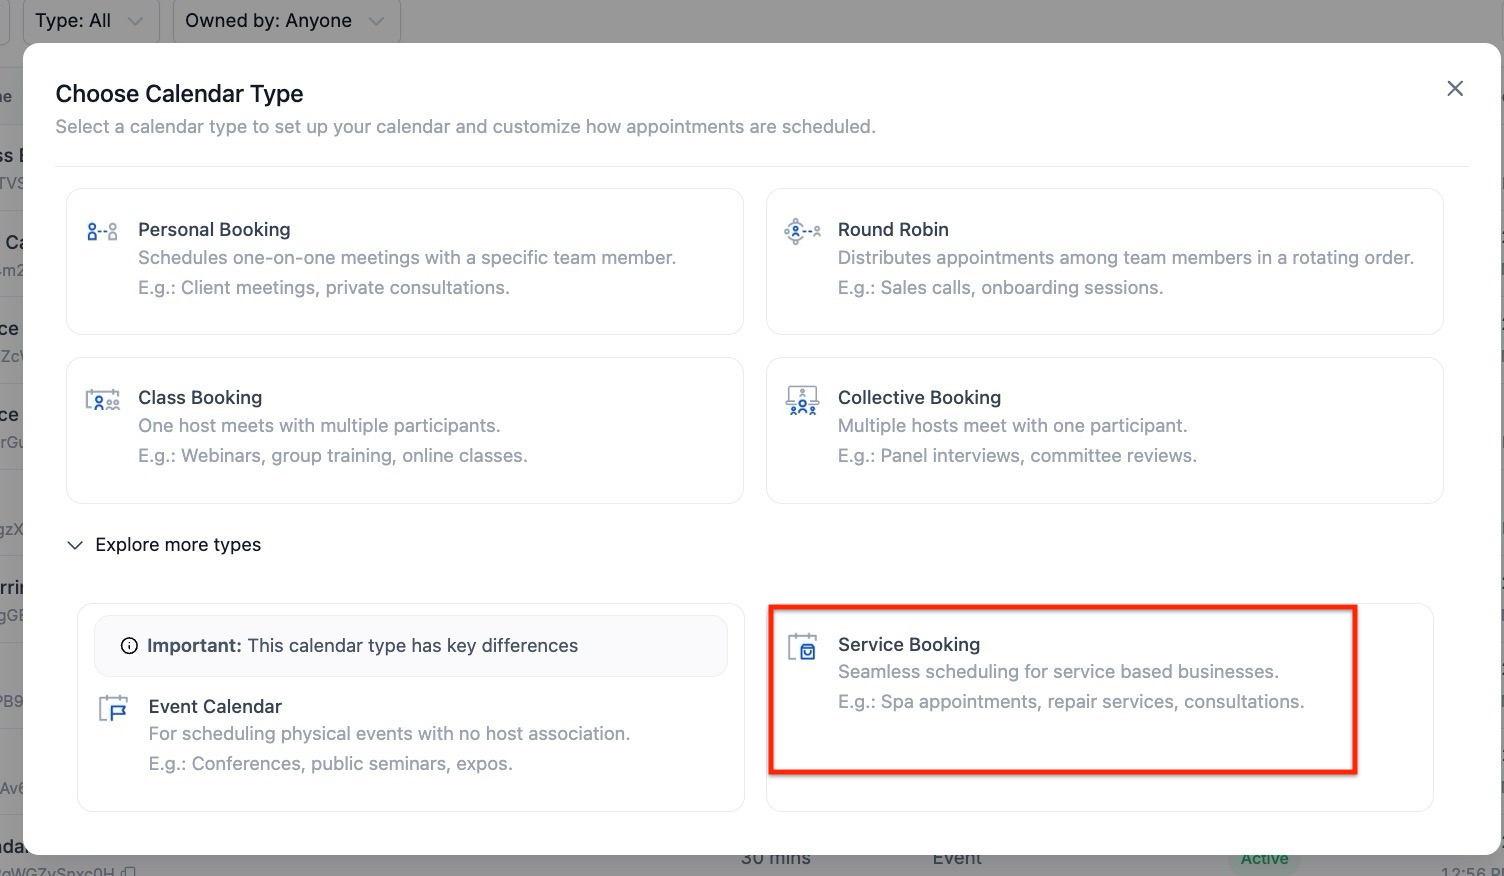
Within this tab, select "Create Calendar" and opt for "Service Calendar."

Key Details to Include:
Calendar Name: Choose a name that represents your service.
Calendar Description: Provide a concise overview of what the calendar entails.
Staff Assignment and Location: Staff Assignment and Location: Select the staff members who will be assigned to the service you're creating the calendar for. Once staff members are selected for a service calendar, you can configure their preferred meeting location from the advanced settings.
Available Meeting Locations:
- Phone: The default value populated will be the subaccount's phone number, but you can edit it to any phone number of your choice.
- Address: The default value populated will be the subaccount's business address, but you can edit it to any address if needed.
- Custom: Use this to enter any custom value, such as your store address, a message for clients, or a static Zoom link.
- Zoom: Dynamic, unique Zoom links will be generated if Zoom is successfully integrated. Ensure Zoom is integrated in 'My Profile' > Calendar Settings > Video Conferencing.
- Google Meet: Dynamic, unique Google Meet links will be generated if Google is successfully integrated and Google Calendar is selected as the linked calendar in the 'My Profile > Calendar Settings' section.
- Ask the booker: Prompt the booker to specify their preferred meeting location, which will be saved for future use. If multiple locations are available, the option 'Elsewhere' will be displayed on the booking widget to indicate this feature.

- Multiple Meeting Locations with Custom Forms: In Calendar Settings, integrate custom forms to collect additional information from bookers. Available for Event and Round Robin / Service Calendars with one team member, and works with the Neo widget.

Service Duration: Clearly state how long each service will take.
URL / Slug: Define a calendar slug or URL that will determine the link to your calendar.

- You can customize your service calendar further with Advanced Options. Simply click on the Advanced Settings Button
Step 2: Enhance Service Details
- Add a logo to your service. This will be displayed on the appointment booking widget for this service calendar.
Note: The service logo differs from the Service Cover Image used for Service Menus or Groups.

-
If you plan to include this calendar in a Service Menu, assign it to a relevant group (in group integration) for better organization. Think of a group as a way to categorize similar services together. For example, you could create a group named "HAIR" and assign service calendars like "Hair Cut," "Hair Spa," and "Hair Coloring" to it.
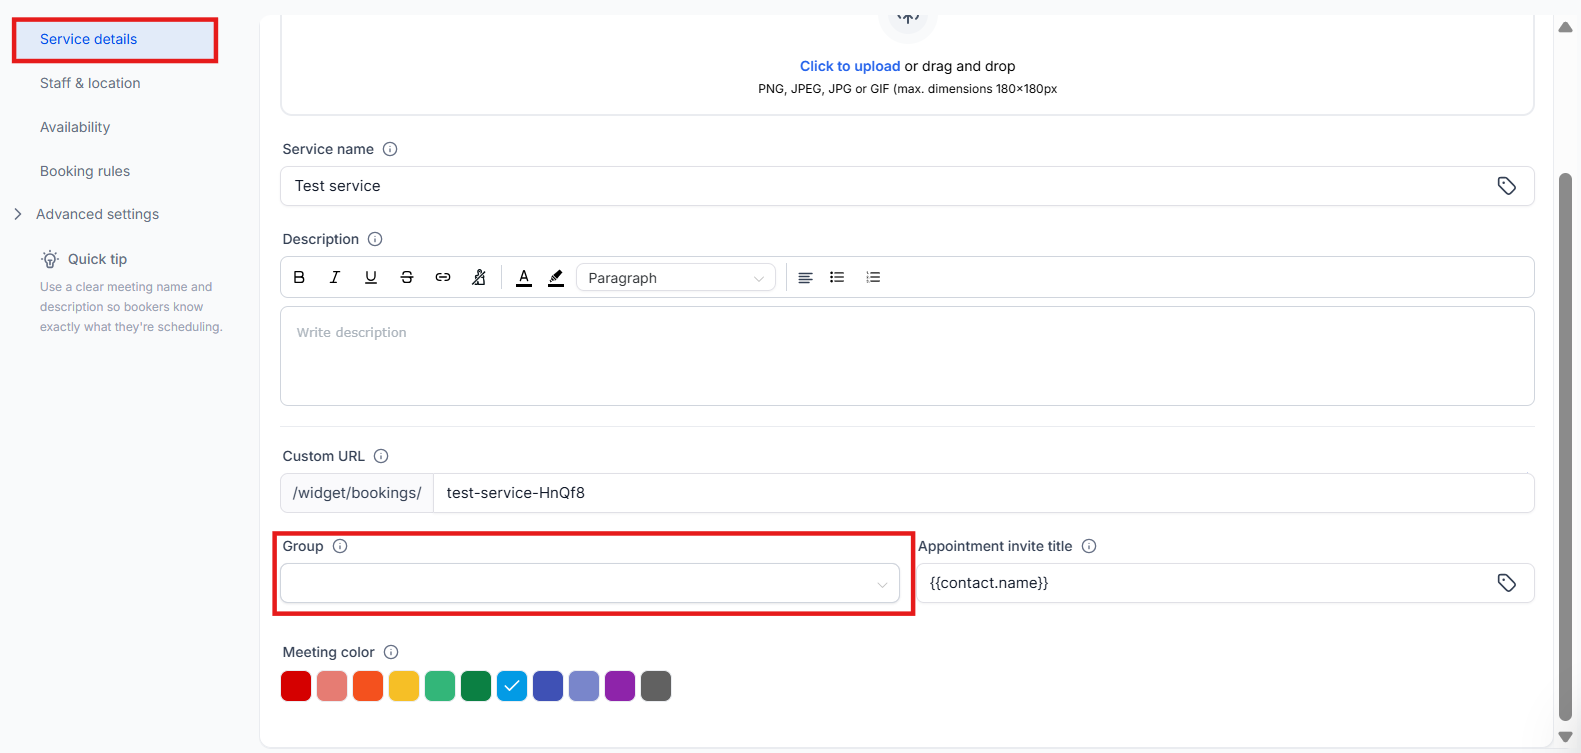

Note: Service Calendars can be used in a Service Menu as well as in a Group
- You can also customize your Appointment Invite Title. This is the title for the Calendar event that shows in Google Calendar, Outlook, Apple Calendar, etc
- Event Color - Choose the event color you want to assign to this calendar. Remember, colors get synced to events in Google Calendars.
- You can also browse, select, and insert images directly from Media Storage when setting up or editing their Service Calendar details.
- This includes images for Services, Add-Ons, Staff, Location, and Company Logos.
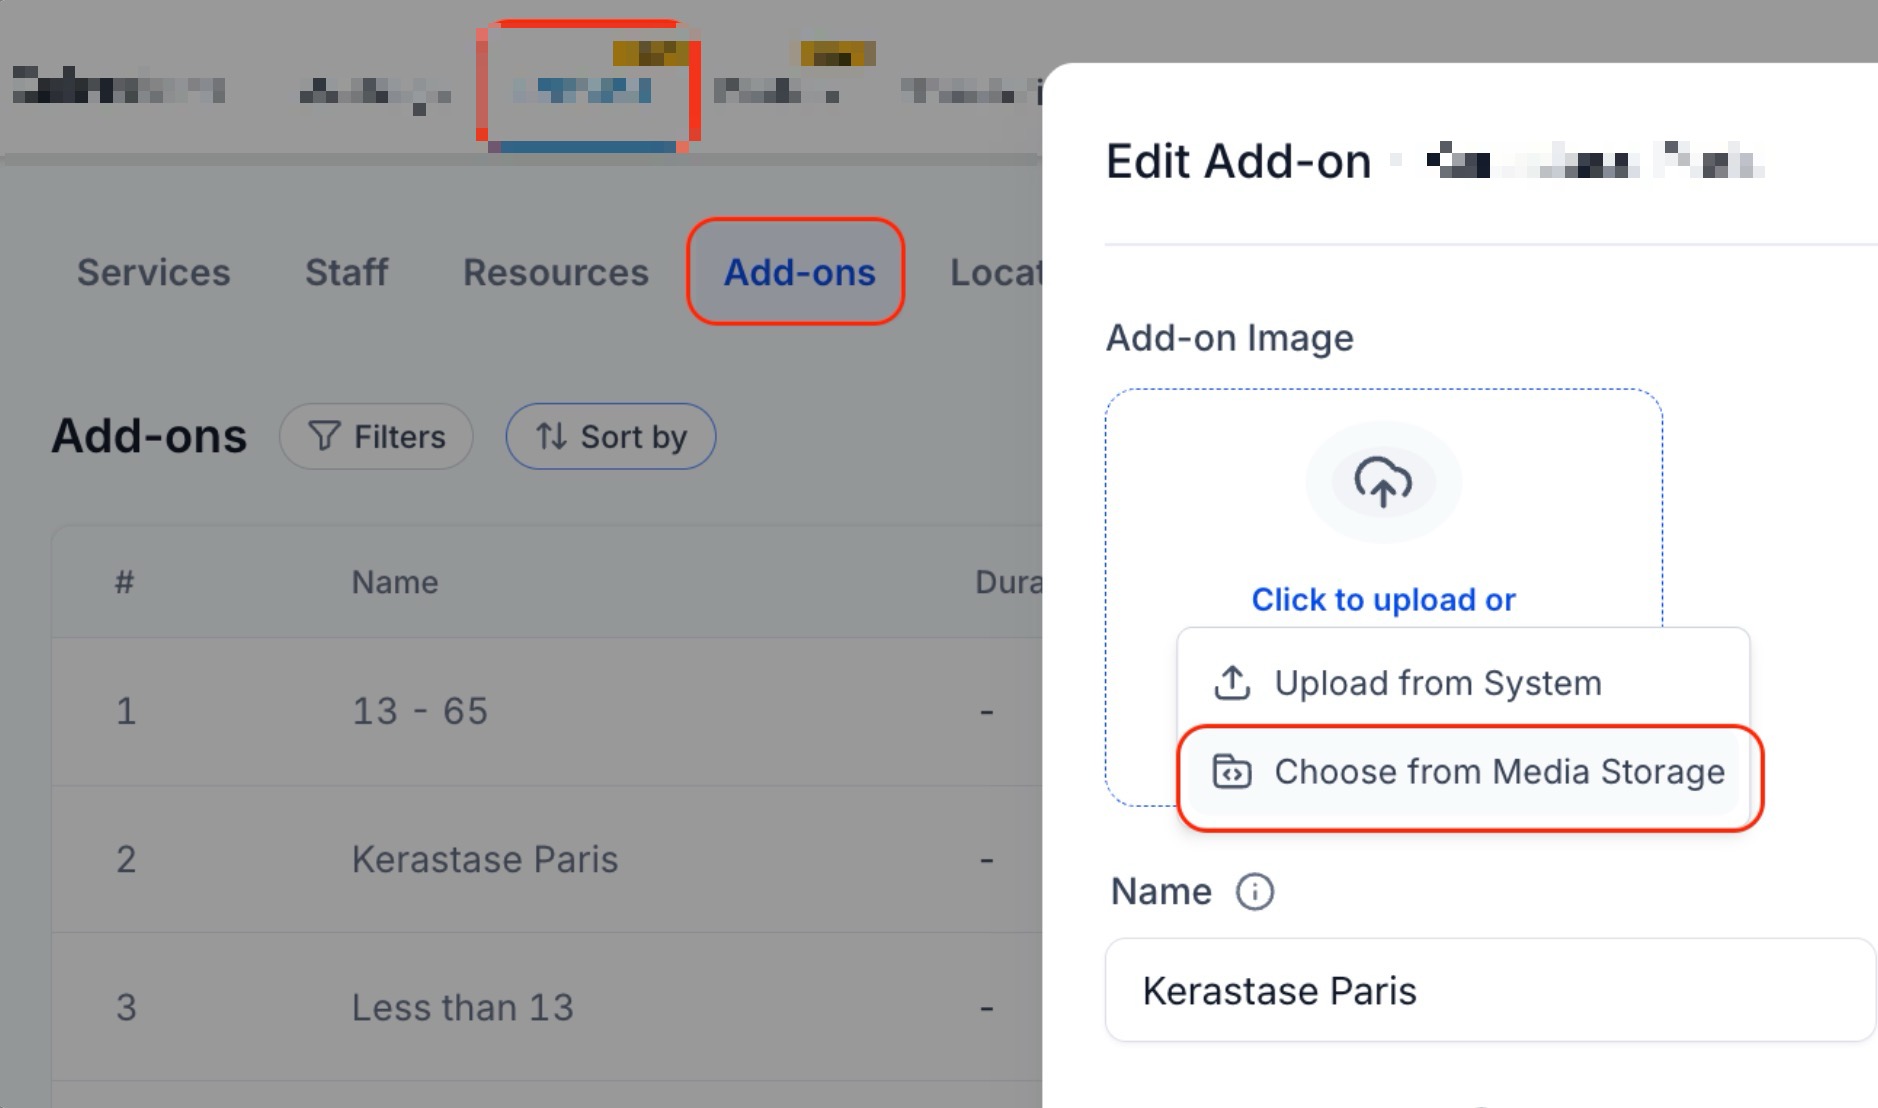

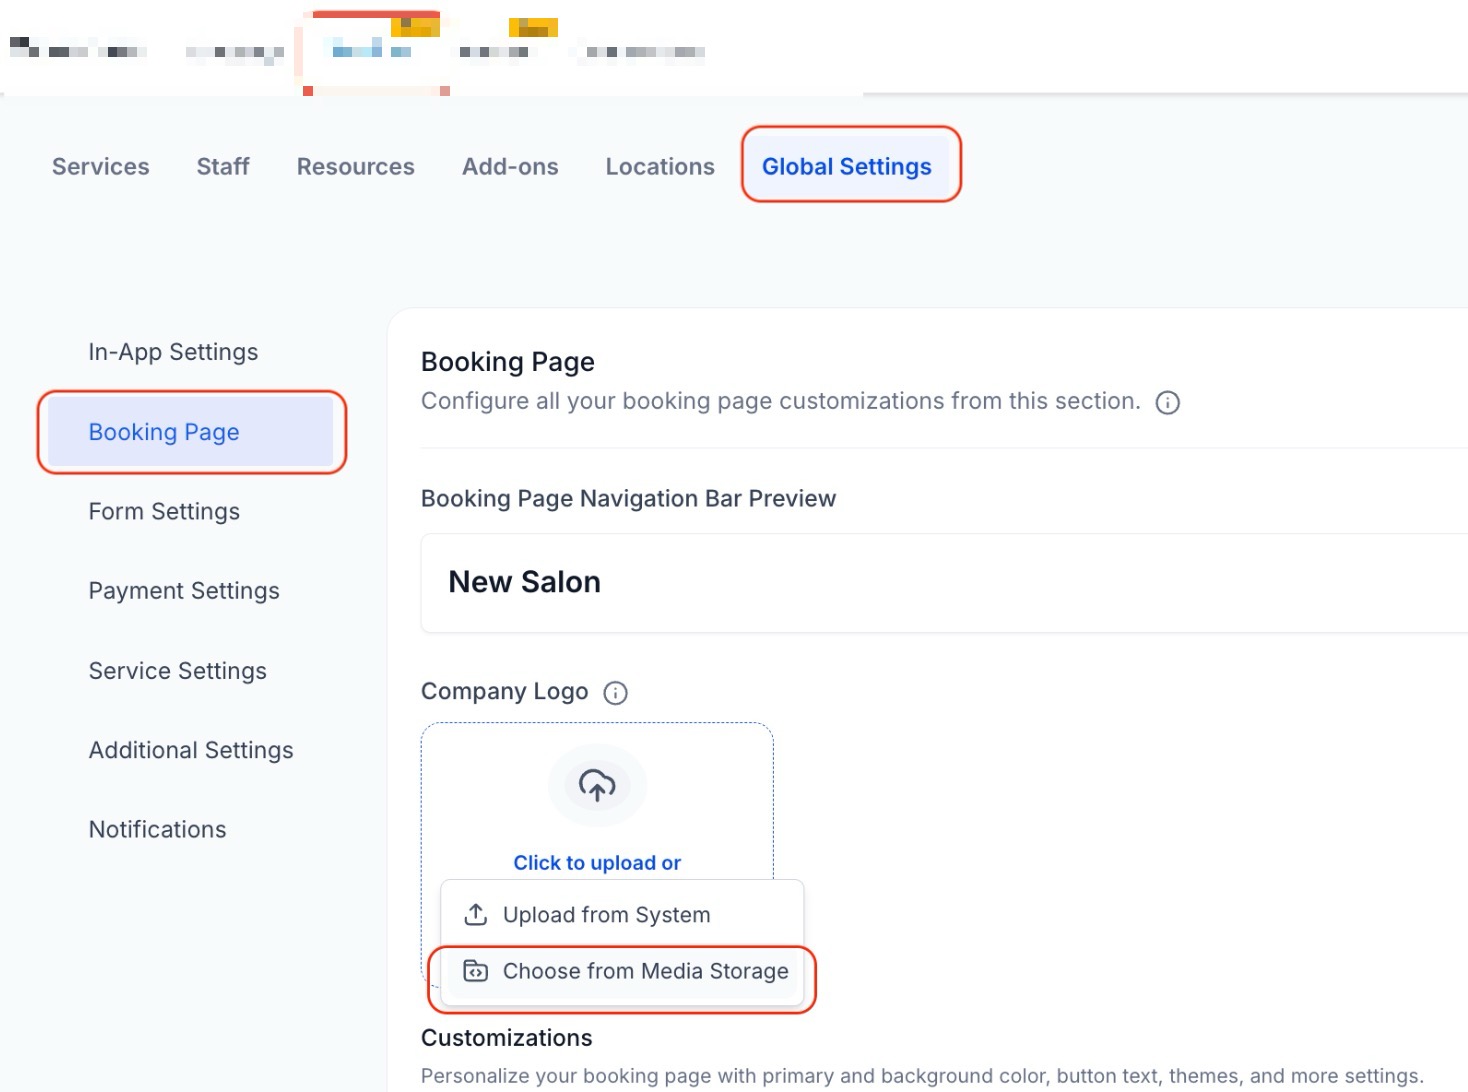
- Users can access images from uploaded files or integrated sources such as Unsplash, Pixabay, or Google Drive (if connected).
Step 3: Availability
- Weekly Working Hours: Set your regular, weekly working hours. This is useful for setting up your default schedule that repeats week after week.
- Date-Specific Hours: Set date-specific hours to customize your availability or unavailability for specific dates. You can add specific dates and define hours applicable only to those dates.

- Booking Widget to Open First Available Date: Bookers can see and select the earliest available slot immediately, eliminating the need for manual searching. This benefits businesses looking to accept early bookings for future events, such as special holidays or seasonal offers.
- To use this feature, configure Date-Specific Hours without setting Weekly Working Hours. For this feature to function correctly, ensure no recurring weekly hours are configured.

- Look Busy
- The "Look Busy" feature is designed to create urgency by hiding a percentage of your available booking slots, making you appear more in demand. The hidden slots are randomized across different days of the week, making your availability appear more realistic and varied.
- By limiting visible time slots, potential clients may feel a greater need to book quickly, which can lead to increased bookings.
- This feature applies to:
- Event calendars
- Round-robin calendars
- Collective calendars
- Service calendars


Please Note: The "Look Busy" feature is not applicable for class bookings and service menus.
- Service Duration: Set the length of each appointment. The maximum duration for a service calendar is 12 hours, aligning with other calendar types.
- Service Interval: Specify your service interval. Users can set any interval or duration they need, such as 20 minutes, 99 minutes, or 12 hours, rather than being limited to multiples of 15 minutes.
- Post Buffer time: Add extra time after appointments for preparation or transition.
- Minimum Scheduling Notice: Set the required advance notice for appointment bookings, specifying how many hours or days before an appointment should the booking be closed.
- Date Range: Define how many days into the future appointments can be booked.

Step 4: Forms and Payments
- In the Forms Configuration field, choose between default or custom forms for client information collection.
Note: Custom forms apply only to direct bookings on a Service Calendar. Default forms are used for bookings through the Service Menu.

- Add Guests: Allow main participants to bring in additional guests, streamlining group schedules. Check the Require Guests for Booking to make at least one guest mandatory.

- In the Confirmation Page Customization field, select between a thank you message or a redirection URL post-booking.

- Seamlessly incorporate scheduling into your analytic journey using pixel ID tracking.

- Activate the Auto-confirm New Appointments feature to instantly confirm new appointments on available calendar slots, ensuring users receive immediate booking confirmations.
- If accepting payments, link your payment gateway under Settings > Integrations.

- Collect Payment for all attendees: Enable this option to charge based on the total number of guests. The payment amount will be multiplied by the total number of attendees, and the booker will be charged accordingly via the booking widget.

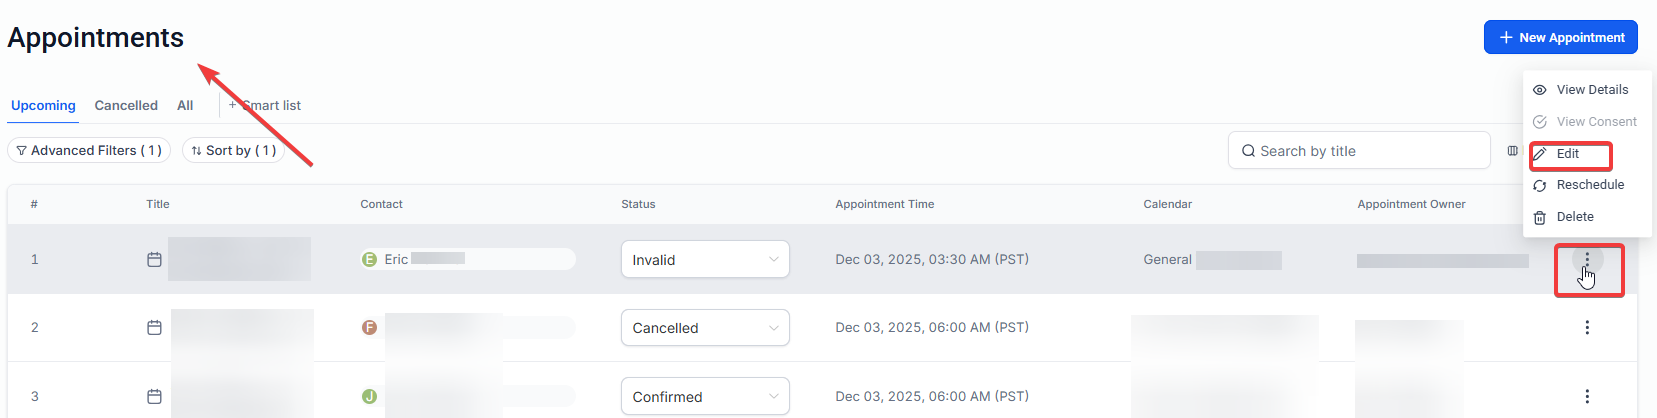
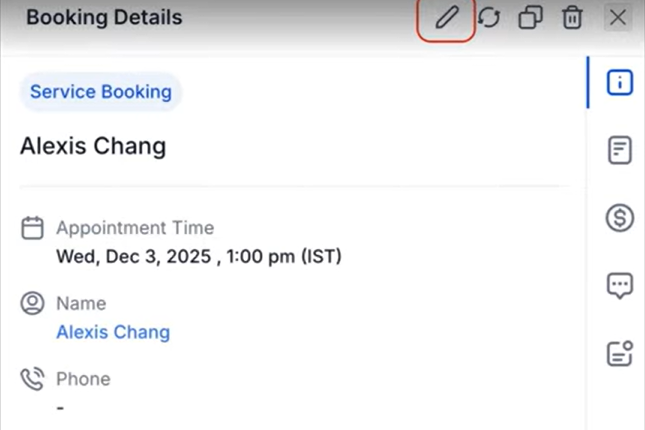
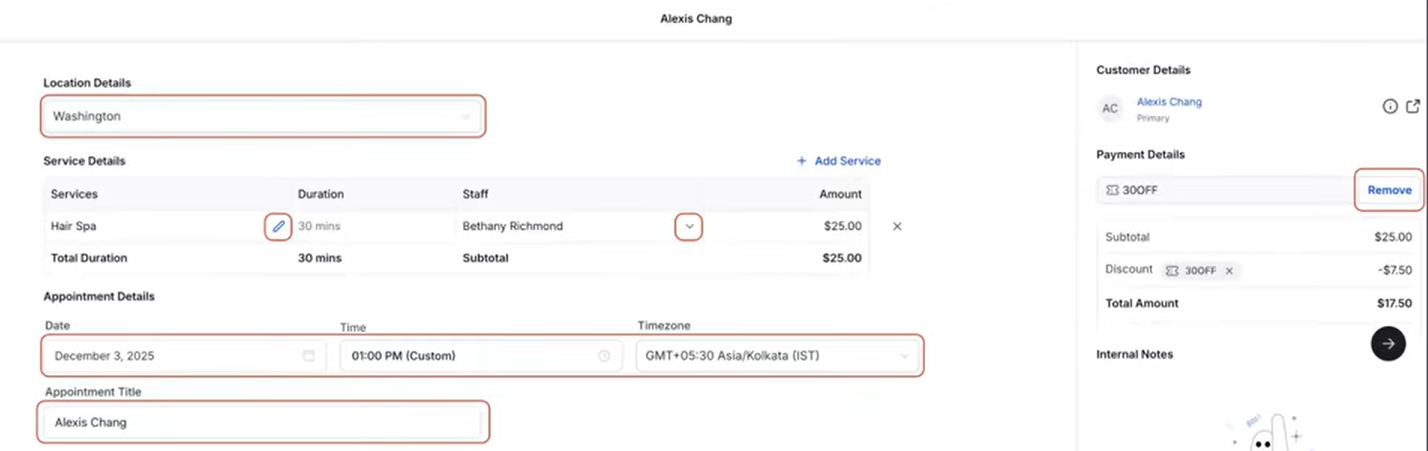
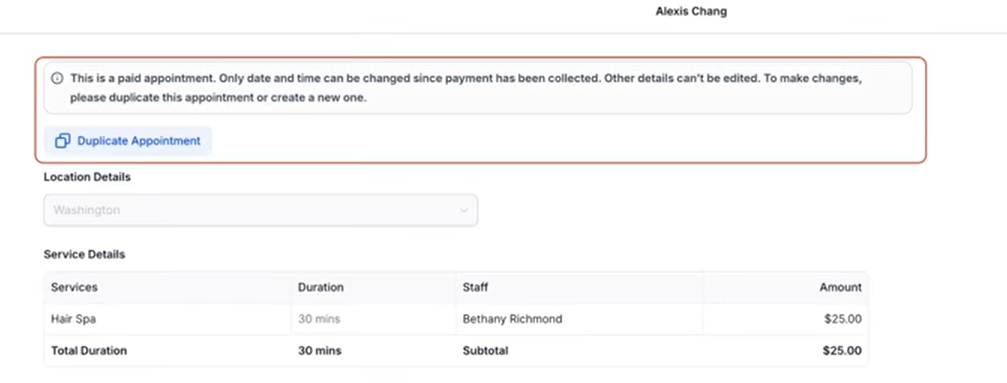
- How to Edit a Service Appointment
To edit a service appointment, go to the calendar view and open the appointment list. Select the appointment you want to modify and click the pencil icon. From there, you can update details such as services, add-ons, staff, location, title, date and time, time zone, or coupon codes. This allows you to make changes without needing to cancel and recreate the appointment.
Step 5: Notifications and Customizations
Users can fully customize their email and in-app notifications related to appointments. This allows users more control over notification content and recipients, with six types of notifications available, including Appointment Booked, Cancellation, and Follow-Up.

- Notifications and their types: You can select who should receive appointment notifications, and whether to allow Google to send invitations or update emails to attendees.
- In-App Notifications: Notifications can be sent through the web app and mobile app, offering flexibility for businesses to choose between sending to the assigned user or any specific users.

- Notifications can be set up for each calendar on an individual level.
- For Event Calendars, the account admin is the default recipient for in-app notifications, while for other calendar types, the assigned user is the default recipient.
- Email Notifications: Enable Email Notifications by toggling them on, and customize the content for different recipients.

-
You can select an existing email template or create a new one with a custom subject line and message body. Set the timing for Reminder and Follow-Up emails, and send a test email if necessary.
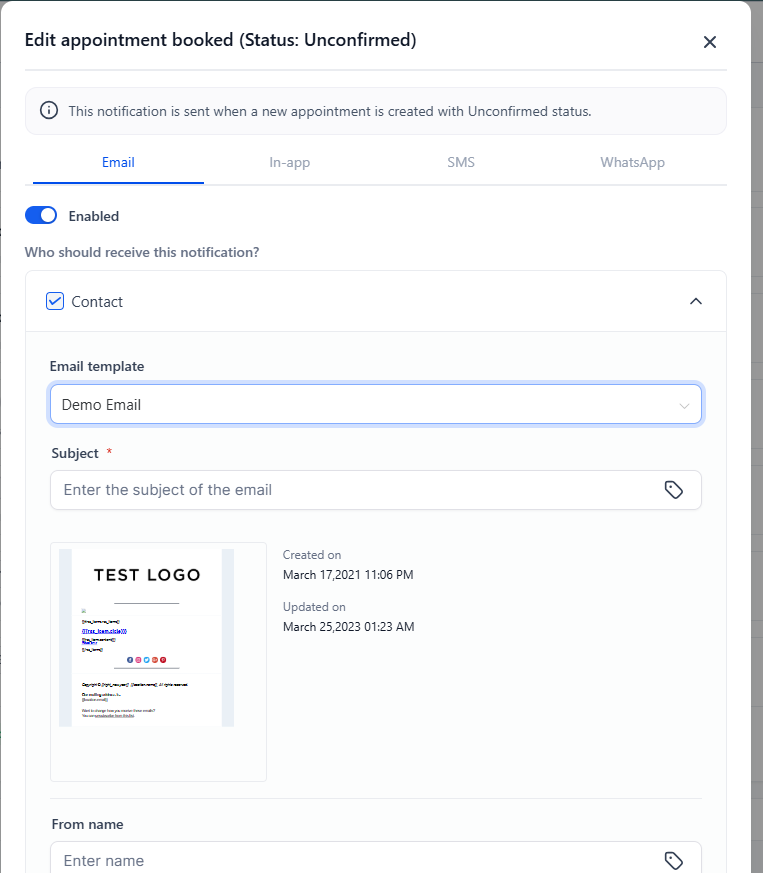
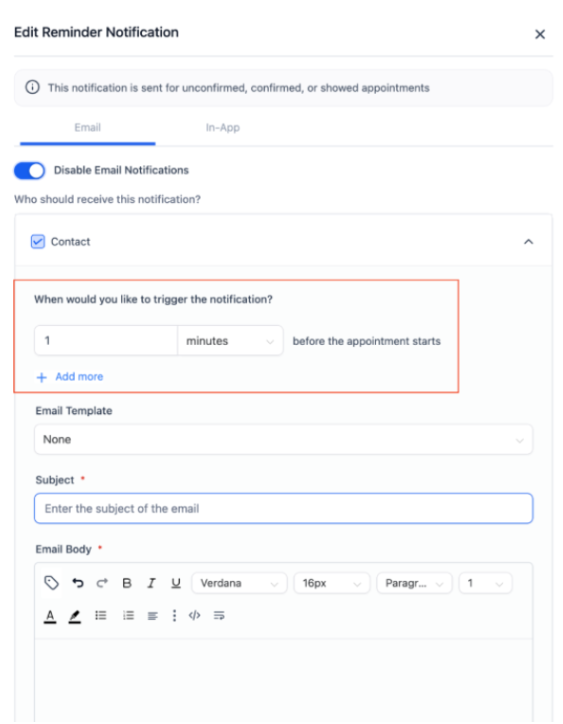
- Click Save to confirm your changes.
-
- Cancellation & Reschedule Policy: Enabling this setting means businesses can set specific time frames after which the cancellation or reschedule links are disabled, requiring bookers to contact the business directly for any changes. (Note: Keeping the value blank means the link will never expire, and the booker can access it anytime.)


- After the appointment has been rescheduled, a "Rescheduled" tag will appear in both the appointment list view and appointment modal. It will also display the previous date and time for easy reference. To use, simply review your appointment list or details to see any marked rescheduled appointments.


- Additional Notes: Anything entered here will be included in the Google invitation. For this feature to work, please ensure that "Allow Google Calendar to Send Invitations" is enabled from the 'Notifications' settings.
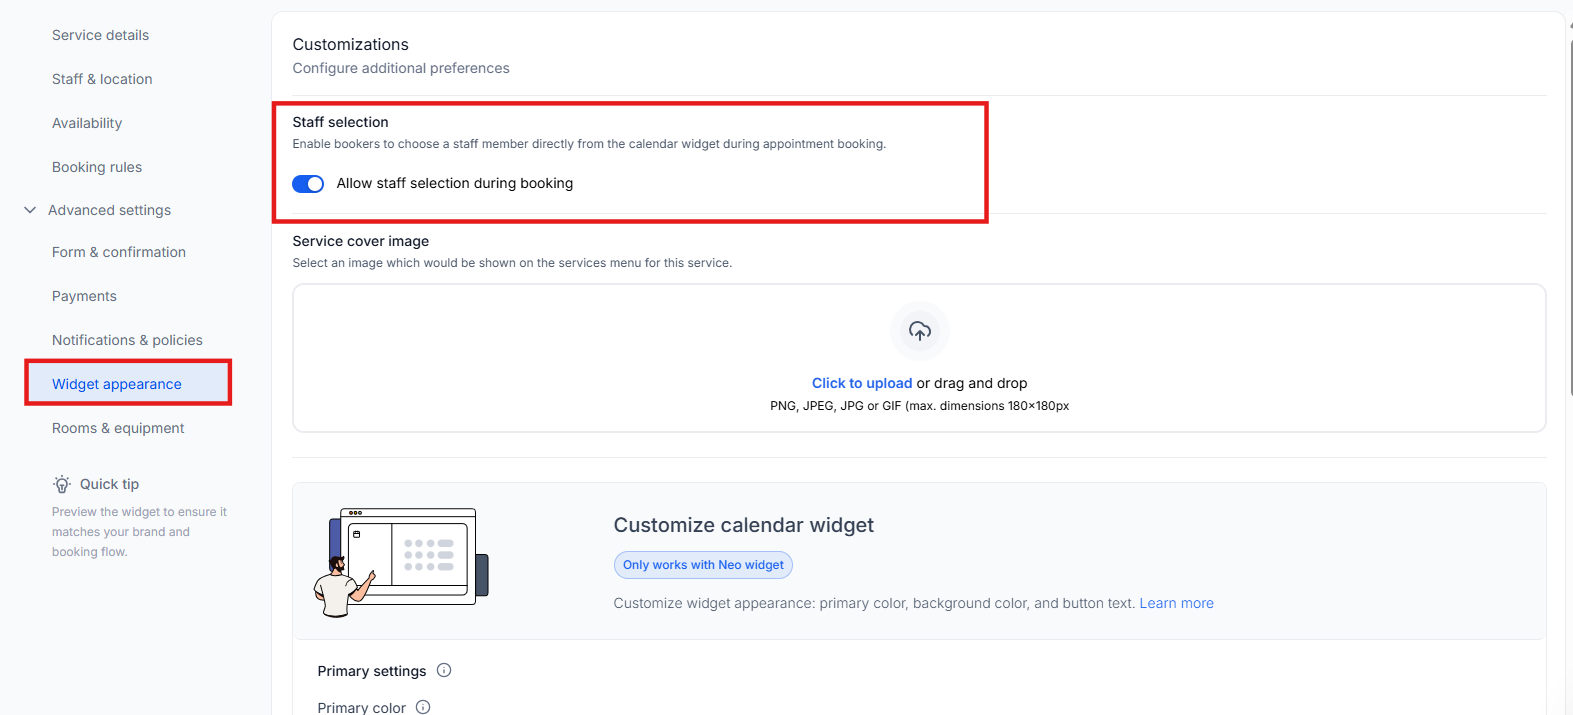
- Customizations - Service Cover Image: Upload an image that represents your service, appearing in menus and widgets.

-
Configure Staff Selection: Enable / Disable bookers to choose a staff member directly from the calendar widget during appointment booking.

Step 6: Rooms and Equipment Allocation
- Associate your service calendar with specific rooms and equipment from your predefined list.

- Upon completion, save your settings, and your Service Calendar is ready for use.
To learn more about Rooms and Equipment, please read the article “Overview of Rooms and Equipment in Calendars”
Troubleshooting Tool for calendars
This tool provides users with detailed insights into unavailable time slots, helping to quickly identify and resolve issues that may be affecting calendar bookings. By showing the reasons behind unavailable slots, the tool enhances scheduling efficiency for businesses and administrators, making it easier to manage calendars without guesswork.
To use, simply go to Calendar Settings, select your calendar, and choose the "Troubleshoot Calendar" option from the three-dot menu to view available and unavailable slots along with explanations.


Key Features of the Service Calendar
1. Multi-Service Bookings: Allows bookings for various services for individuals or groups.
2. Fixed Slot Interval: Operates at a 15-minute interval, enhancing scheduling efficiency.
3. Staff Linked Availability: This only reflects the availability of assigned staff members.
4. Group and Service Menu Integration: To showcase different services under one link, first create groups, then assign service calendars to these groups, and finally configure your Service Menu.
To learn more about the Service Menu feature, please read the article” Overview of the Service Menu in Calendars.”
FAQ
Question: Can I assign multiple staff members to a single service in the Service Calendar?
Answer: Yes, you can assign multiple staff members to a single service. The calendar will reflect the availability of the assigned staff members, allowing clients to book based on who is available.
Question: Can I set different service durations for appointments within the same calendar?
Answer: No, each Service Calendar can only have a set service duration that applies to all appointments booked within that calendar. You need to create separate calendars for services requiring different durations.
Question: Is it possible to allow clients to select a specific staff member when booking?
Answer: Yes, by enabling the staff selection option in the Service Calendar settings, clients can choose their preferred staff member directly from the booking widget.
Question: Can I set different availability hours for specific dates in the Service Calendar?
Answer: Yes, you can set date-specific hours that override your regular weekly working hours for particular dates, allowing for more customized availability.
Question: Why are some time slots unavailable on my calendar?
Answer: The Troubleshooting Tool provides a detailed explanation for unavailable time slots, helping users understand why certain times cannot be booked. By using the tool, you can identify specific issues such as conflicting appointments, user availability, or calendar settings that may be blocking these slots. To view the reasons, navigate to Calendar Settings, select your calendar, and use the "Troubleshoot Calendar" option from the three-dot menu.
Question: Can I customize the content of email and in-app notifications for appointments?
Answer: Yes, you can fully customize both email and in-app notifications, allowing you to control the content and choose specific recipients. You can create custom messages for notifications such as Appointment Booked, Cancellation, and Follow-Up.
Question: Who receives the default notifications for different calendar types?
Answer: For Event Calendars, the default recipient for in-app notifications is the account admin. For other calendar types, the assigned user is the default recipient for notifications.
Question: Can I set a cancellation or reschedule policy?
Answer: Yes. You can specify a time frame after which the cancellation or reschedule link becomes inactive. Leaving it blank means the link never expires.
Question: How can I add images to my service calendar?
Answer: You can now easily browse and insert images directly from Media Storage when creating or editing services, add-ons, staff, location, and company logo images.
Question: Can I set a "Buffer Time" that only applies to certain services?
Answer: Yes. Unlike global calendar settings, Service Calendars allow you to set Service-Specific Buffer Times. For example, a "Hair Coloring" service might need a 30-minute post-buffer for cleanup, while a "Consultation" might only need 5 minutes. This ensures your staff is never double-booked during cleanup or prep time.