How To Record Calls And Listen To Recordings
The call recording feature provides a straightforward way to track and manage interactions between your customers and team members, ensuring quality and consistency in communication. By recording calls, you can review conversations to verify that your team delivers accurate and consistent information. Additionally, the platform allows you to control which phone numbers have call recording enabled, making it easy to tailor the settings to meet the specific needs of different departments, such as customer support lines, sales teams, or other business units.
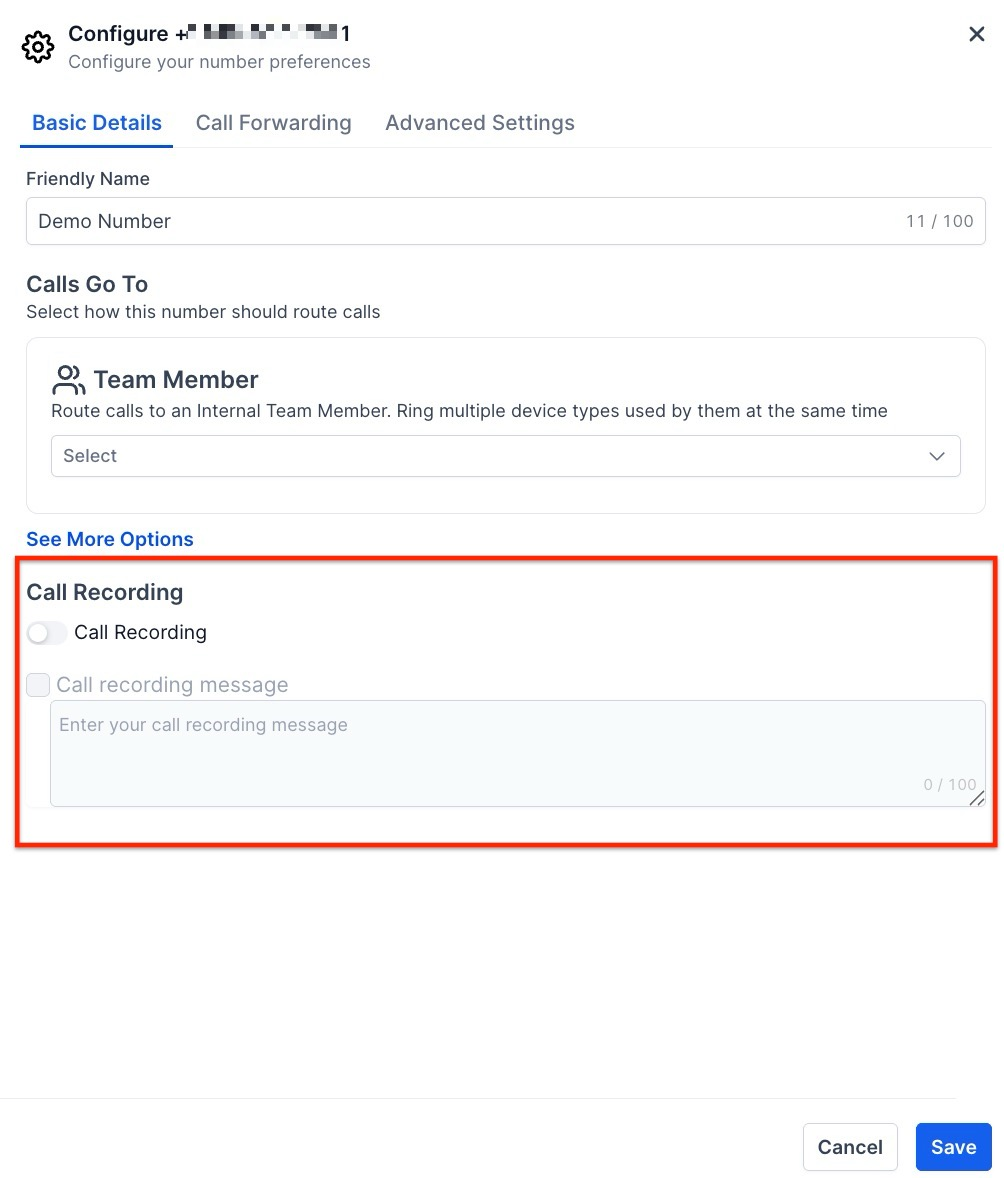
How to enable Call Recording
-
Go to Settings > Phone Numbers
-
Click on the Edit icon next to the phone number you want to enable call recording for, and select the ‘Edit Configuration’ option
-
Check the checkbox for Call recording (Default message: This call will be recorded for quality assurance).


Important: Call Recording Message Mandatory
Previously, if the field was left blank, a default message was played, and if it contained only a blank space, nothing was played. Now, any attempt to edit phone number settings with a blank or blank space recording message will prompt you to enter a valid message.

- Simply enable the call recording feature, Save the changes, and all incoming and outgoing calls on the selected phone number will be automatically recorded.
Note: Recording calls may incur an additional cost depending on your service plan.
Listening to Recordings
You can listen to the call recordings in multiple places within the system. The steps are mentioned below for each section where call recording can be found:
Contact Details
- Navigate to the Your Customers > Contacts tab and choose the contact you wish to listen to a recorded call with.
- Click into that contract record. Within the contact record for that individual contact, the center panel of the contact page will display the conversation you've had with the contact- from texts to emails to calls.
- Recorded calls will be available with a play button, and you can click that to listen to the recorded call. You will also see a stop button, volume button, and download button.

Conversations/Inbox Tab
You can also view all the contact conversations under the Conversations tab where all the call recordings are available for each contact individually.

Call Reporting
The final place where all the call recordings are available is the call reporting tab under Reporting > Call Reporting. You will be able to view all your incoming and outgoing calls here. If the call recording feature is enabled, you’ll be able to listen to the recordings for each call listed in the report.

Note:
You have the option to download call recordings, enabling you to store them locally for future reference or share them with team members as needed.
Control Recording Storage Bills by Auto-Deleting Older Call Recordings
This feature allows you to manage and control your call recording storage costs by enabling the auto-deletion of older call recordings.

The default retention period for call recordings is set to 90 days, but you have the flexibility to adjust this period to suit your needs.

Benefit: By limiting the storage to only recent recordings, you can efficiently manage your storage expenses while keeping your data organized.

Note 1: Call transcripts remain unaffected by the deletion of recordings.
Note 2: This feature is available to sub-account admins only.
Note 3: Please note, this is only to control call recording 'storage' bills.
Call Tracking and Voicemail Resilience
This feature allows users to see exactly who answered each incoming call directly in the conversation details. This provides greater transparency in call handling and ensures team accountability.
How to Use:
- Access conversation.
- By clicking on the three dots next to any call entry, view the “Answered By” information, including a link to the user profile if needed.


Frequently Asked Questions
Q1: How do I enable call recording for a specific phone number?
To enable call recording, go to Settings > Phone Numbers, click on the Edit icon next to the desired phone number, and select ‘Edit Configuration.’ Check the box for Call Recording, save the changes, and all incoming and outgoing calls on that number will be recorded automatically.
Q2: Where can I listen to call recordings?
You can listen to call recordings in multiple places within the system:
- Contact Details: Navigate to the Your Customers > Contacts tab, select the contact, and find recordings in the conversation panel.
- Conversations Tab: View all contact conversations, including call recordings, under this tab.
- Call Reporting: Access all incoming and outgoing call recordings in the Call Reporting tab under Tools & Reporting > Reporting > Call Report.
Q3: Can I download call recordings?
Yes, you can download call recordings from within the contact record or the call reporting sections. This allows you to store them locally for future reference or share them with team members as needed.
Q5: Are there any additional costs associated with call recording?
Yes, enabling call recording may incur additional costs depending on your service plan. It's important to monitor your call recording usage through the account dashboard to manage and anticipate storage costs effectively.
Q6: Does this feature delete the actual call recordings or just the storage?
A: This feature specifically manages storage by deleting older recordings, not the call transcripts or other data.
Q7: How can I see which specific team member answered an incoming call?
A: You can view this information by accessing the conversation details and clicking on the three dots next to any call entry. This will show you the Answered By information and include a link to that user profile.