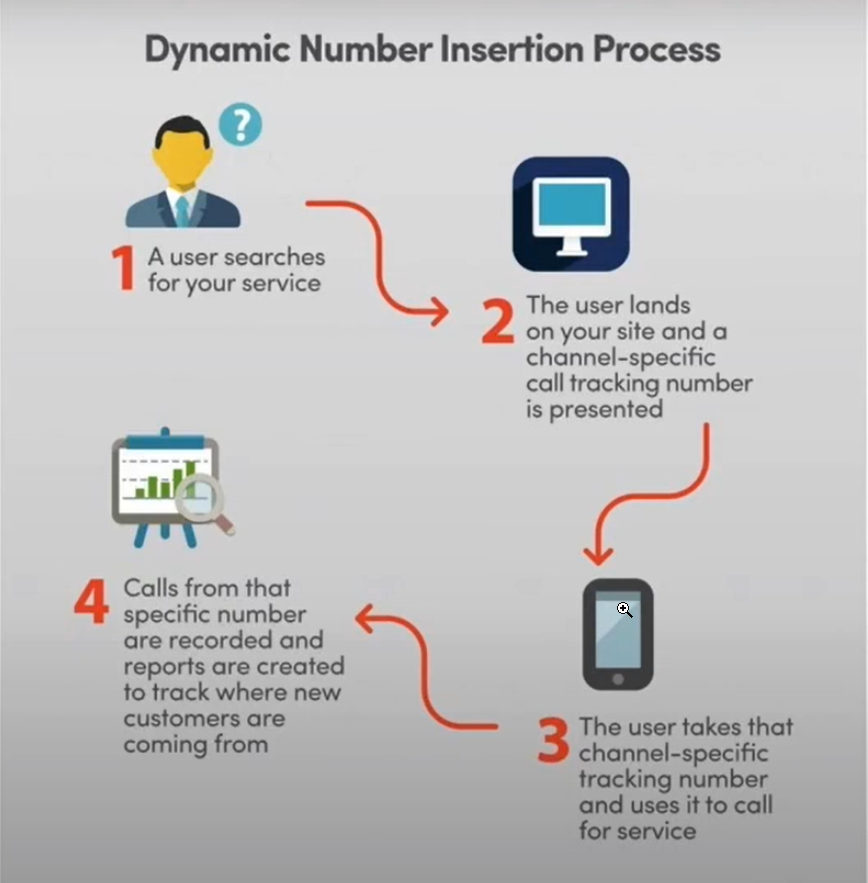
Call Tracking
Call tracking is a powerful tool for businesses looking to understand the origins of their incoming calls, whether they stem from email blasts, Facebook ads, Google ads, or other marketing efforts. Utilizing number pools in a Mastermind can significantly enhance your understanding of call sources and lead generation strategies. Here's a comprehensive guide on setting up call tracking using number pools in Mastermind.
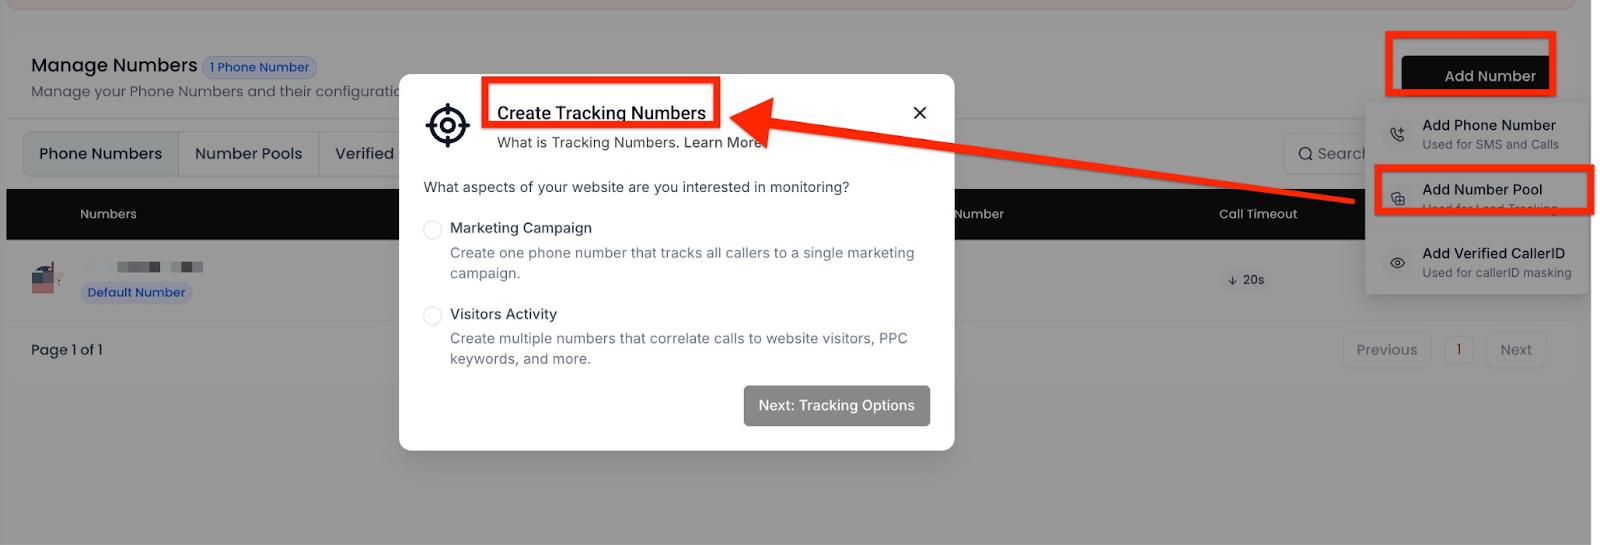
Step 1: Create a Number Pool
Navigating to Number Pool Settings
- Select 'Settings' and then 'Phone Numbers'.
- Here, you have the option to add a new Number Pool or edit an existing one.
Creating the Number Pool
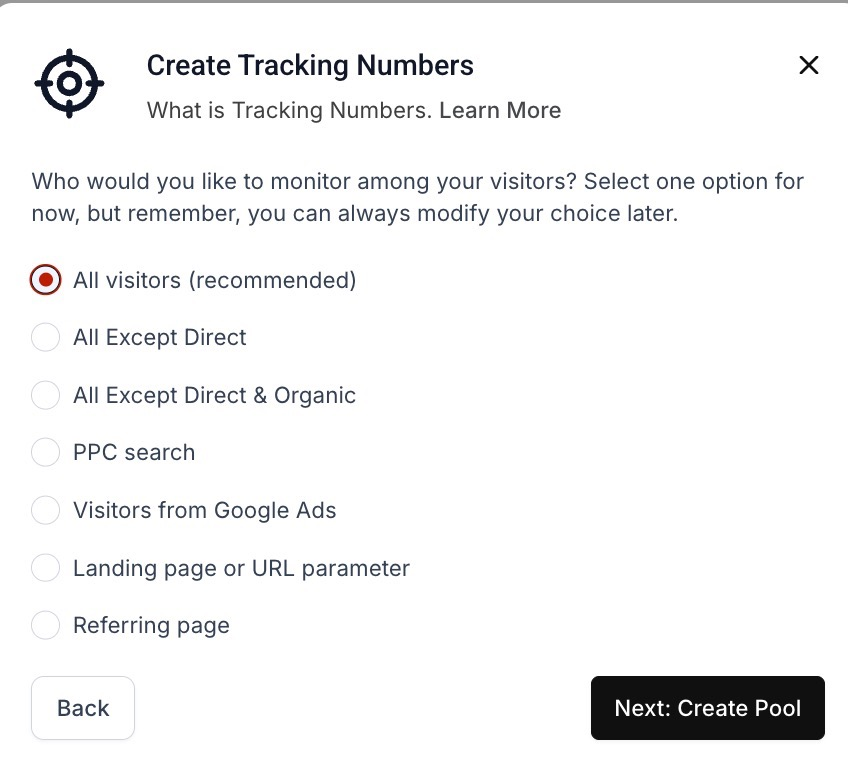
- In the pop-up window, you will find two options: 'Track visitor activity' and 'Track a marketing campaign'.
- Track visitor activity: This option is broader and more versatile, designed for businesses looking to monitor multiple sources of web traffic and marketing channels simultaneously. It's ideal for tracking calls originating from various online activities, including PPC (pay-per-click) keywords, Facebook ads, Google ads, and more, offering a comprehensive view of visitor interactions across different digital platforms.
- Track a marketing campaign: This option is more specific and focused, suitable for tracking calls from a single, targeted marketing initiative. It's perfect for businesses conducting a one-time email blast or a specific marketing campaign, allowing for a concentrated analysis of the campaign's effectiveness in generating calls and leads.
- Choose the option that aligns with your marketing strategy.
- After selecting your tracking option, click 'Create Pool'.
- You can edit these settings later if needed.
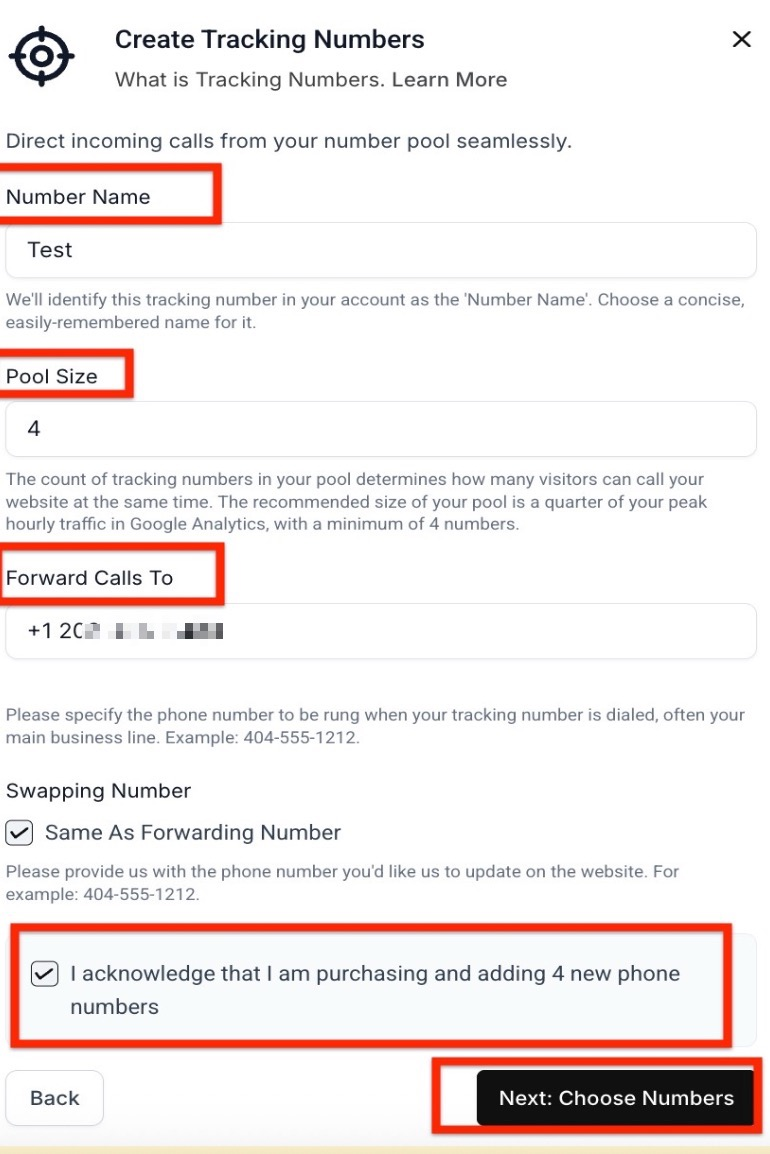
Configuring Your Number Pool
- Give your number pool a name.
- Decide on the number of phone numbers you want in your pool (e.g., 2, 5, 8 numbers).
- Set the 'Forward Calls To' number – where the calls will be directed.
- Decide whether to use the 'Swapping Number' feature.
- Confirm the purchase of additional numbers.
- Click 'Next: Tracking Options'.
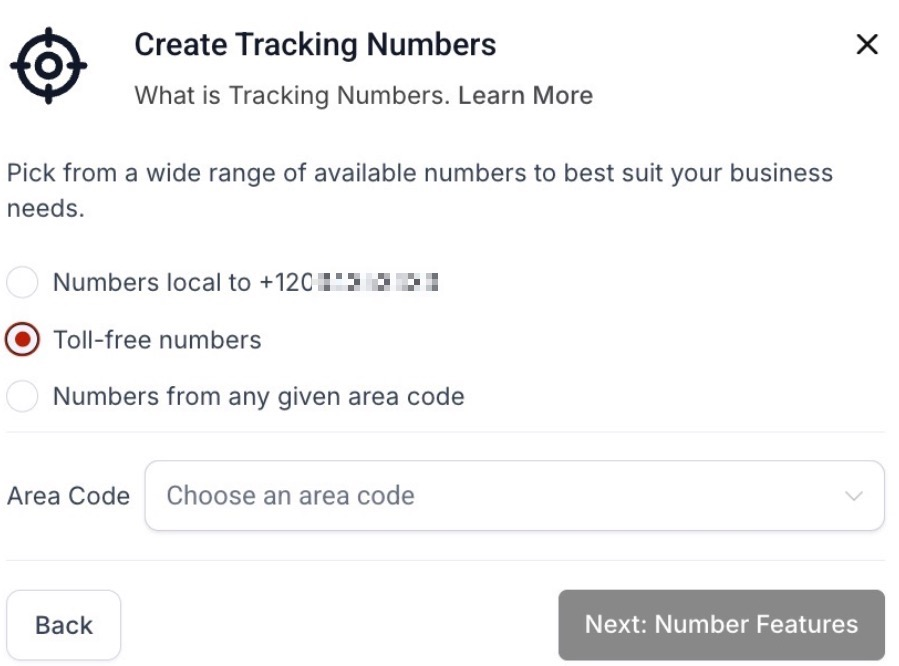
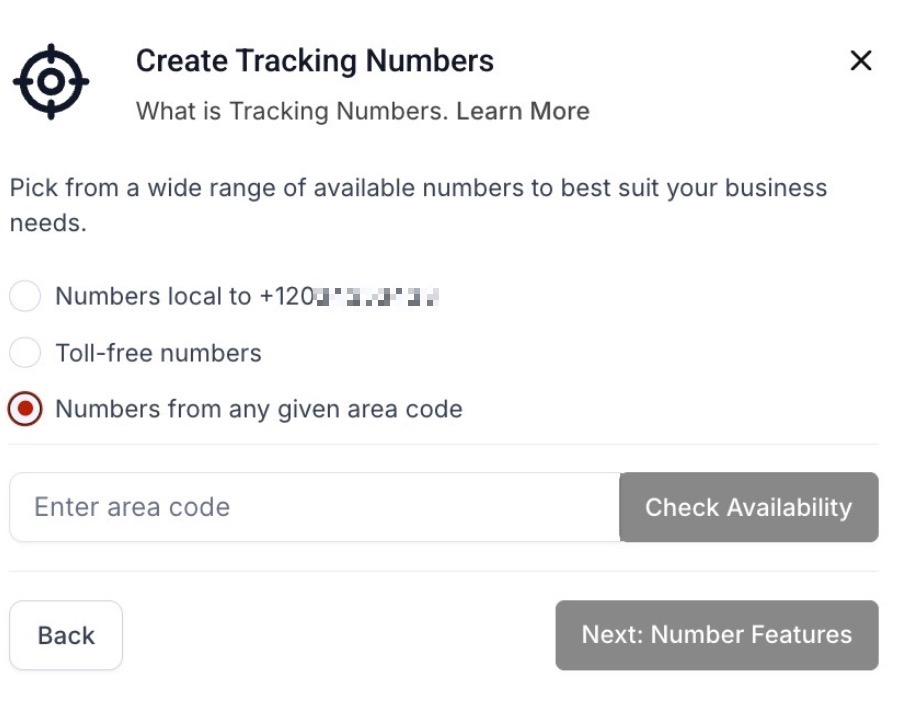
The three options for creating tracking numbers for a business's call tracking needs are as follows:
Numbers local to your given number: This option allows businesses to create tracking numbers that are local to a specific number they already own. It's ideal for companies aiming to maintain a local presence and can be advantageous for callers who prefer dialing local numbers over toll-free or non-local numbers.
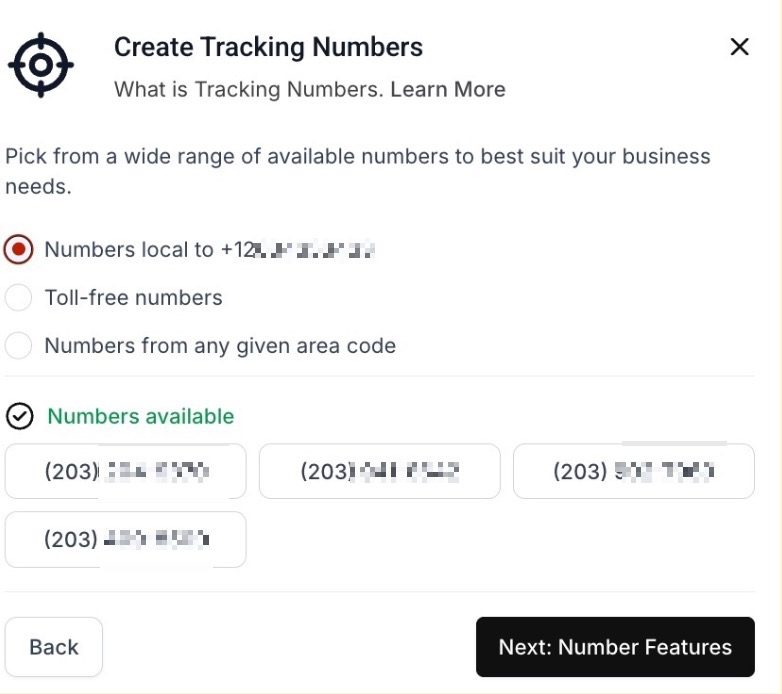
Toll-free numbers: Selecting this option provides businesses with toll-free tracking numbers. These are particularly useful for companies looking to project a national presence and offer customers free-of-charge calls, potentially increasing the likelihood of customer engagement.
Numbers from any given area code: With this option, businesses can choose tracking numbers from specific area codes, regardless of their primary number's location. This is useful for targeting specific geographic markets or giving the impression of a local presence in areas where the business is not physically located.
Additional Settings
- Select a whisper message (e.g., 'new call from ad campaigns').
- Enable or disable call recordings, complying with local laws.
- Click 'Activate Number' and 'Done' to finalize the Number Pool setup.

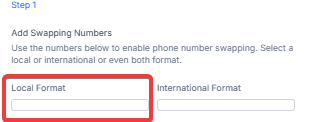
Step 2: Update Your Number Formatting
- Access 'Tracking Numbers' under the 'Phone Numbers' page.
- Your 'Swapping Numbers' will be the primary numbers shown on your site/ad/page, while 'Pool Numbers' are used for tracking.
- Consider formats like 111-222-3333, 111.222.3333, or (111) 222-3333 for U.S. numbers.
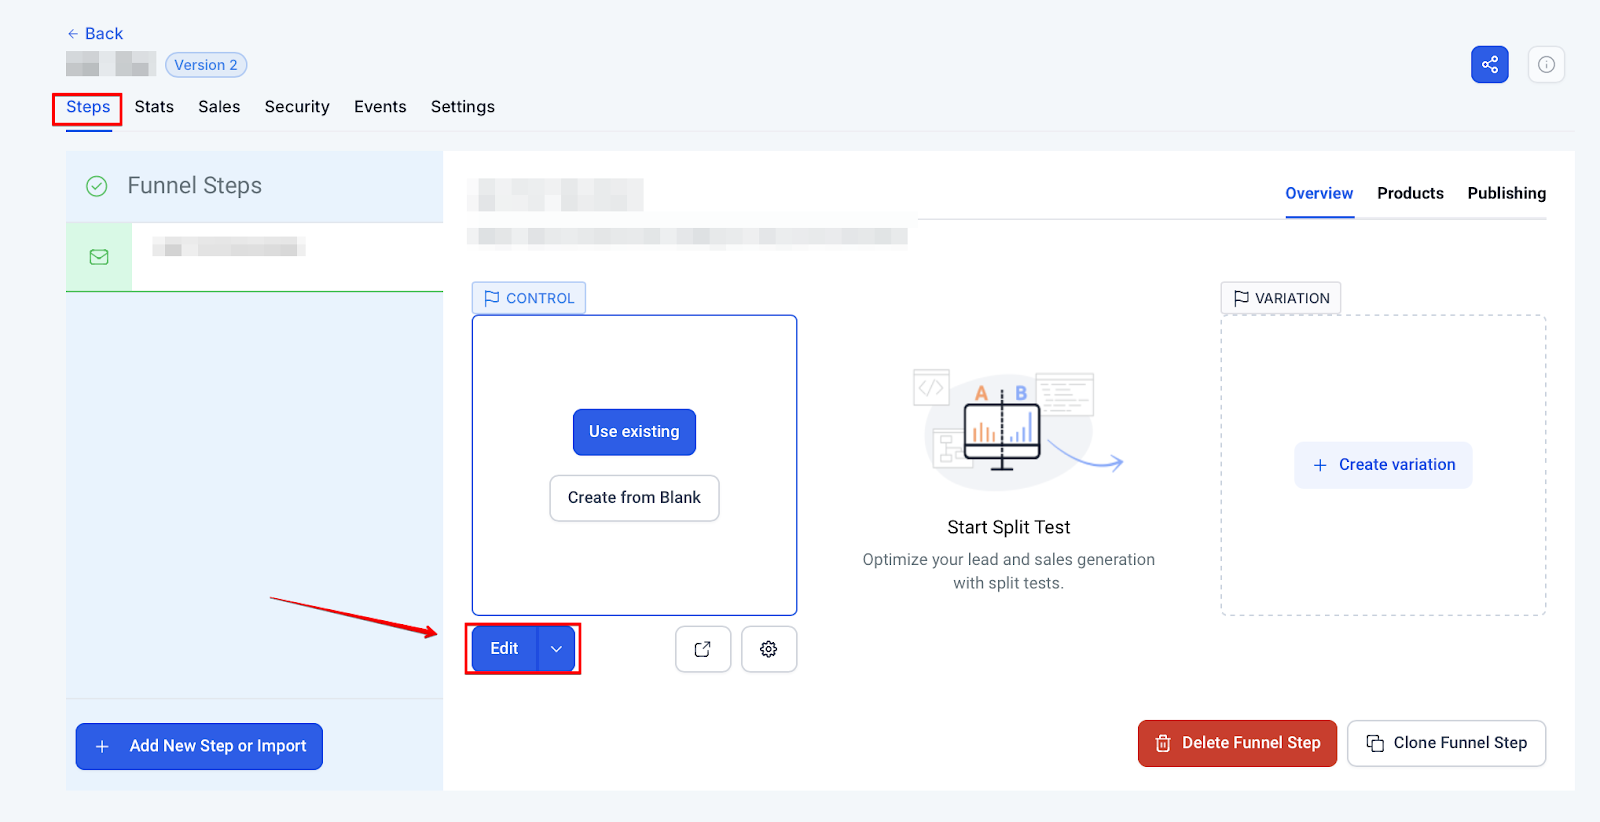
Step 3: Display a call tracking number on a funnel
Obtain a Call Tracking Number:
Choose a call tracking number from Mastermind's call tracking feature, selecting either a local, toll-free, or specific area code number that aligns with your marketing strategy.
Configure the Call Tracking Number:
Set up your call tracking number settings, such as call forwarding, recording options, and whisper messages within Mastermind platform.
Integrate the Tracking Number into the Funnel:
Copy the tracking code snippet or the actual tracking number provided by Mastermind.
Navigate to the funnel where you want to display the number.
If your funnel builder supports dynamic number insertion, paste the tracking code snippet into the website's header or footer code section or within the specific widget designated for phone numbers.
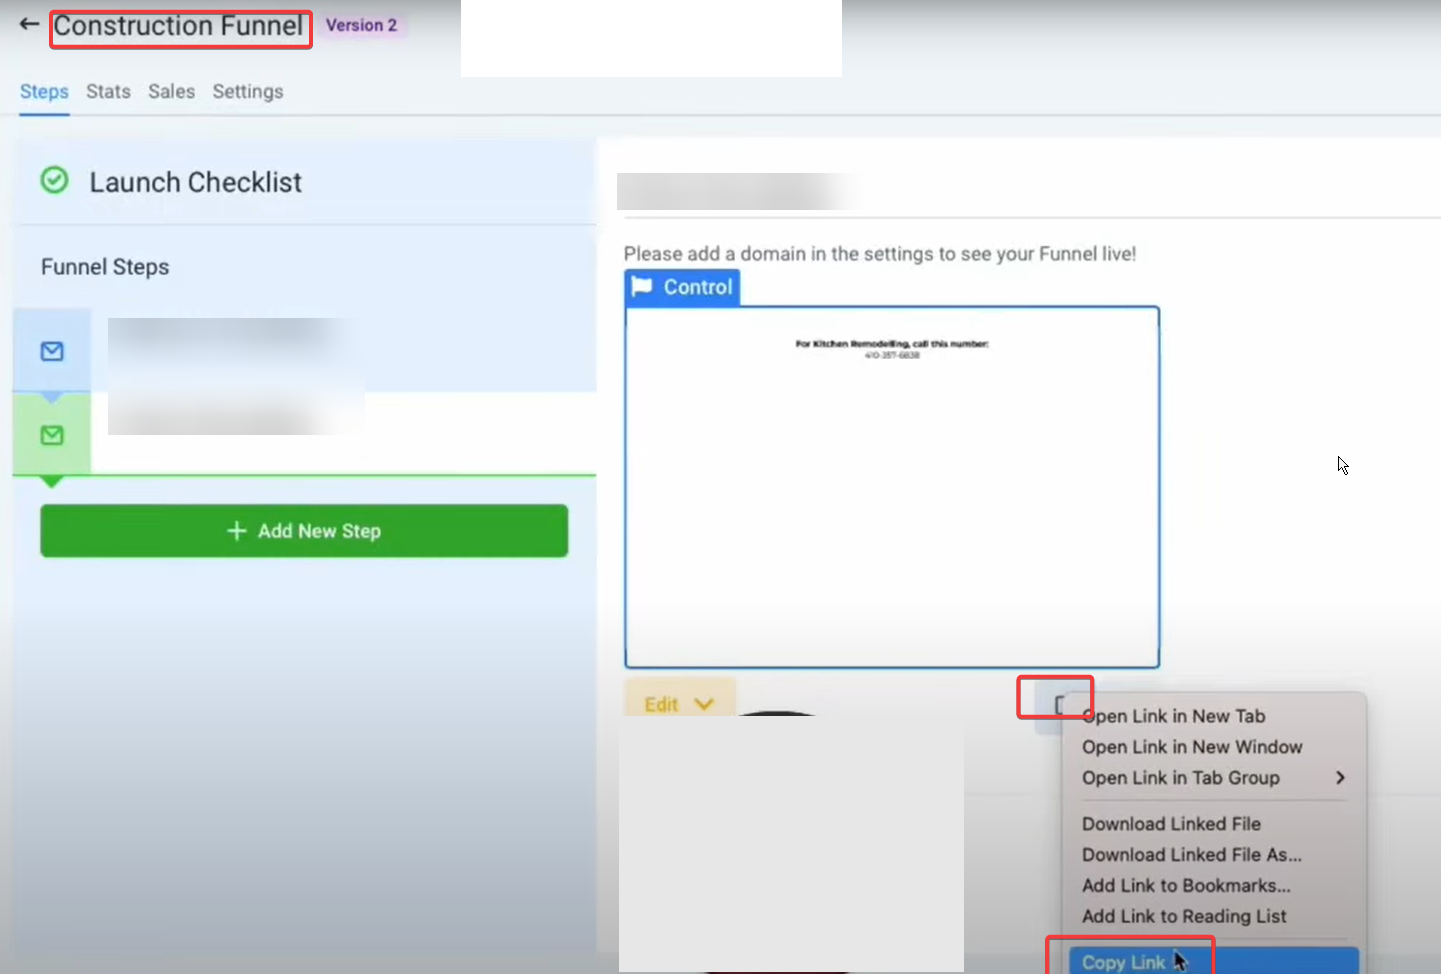
Test the Tracking Number Display:
Open the funnel page in an incognito window or a different browser to ensure the tracking number is displayed correctly.

Ensure the number changes dynamically if you use a number pool for different visitors or traffic sources.
Publish or Update the Funnel:
Once confirmed that the tracking number appears correctly, save any changes.

If necessary, publish the updated funnel page to make the tracking number live for visitors to see and interact with.
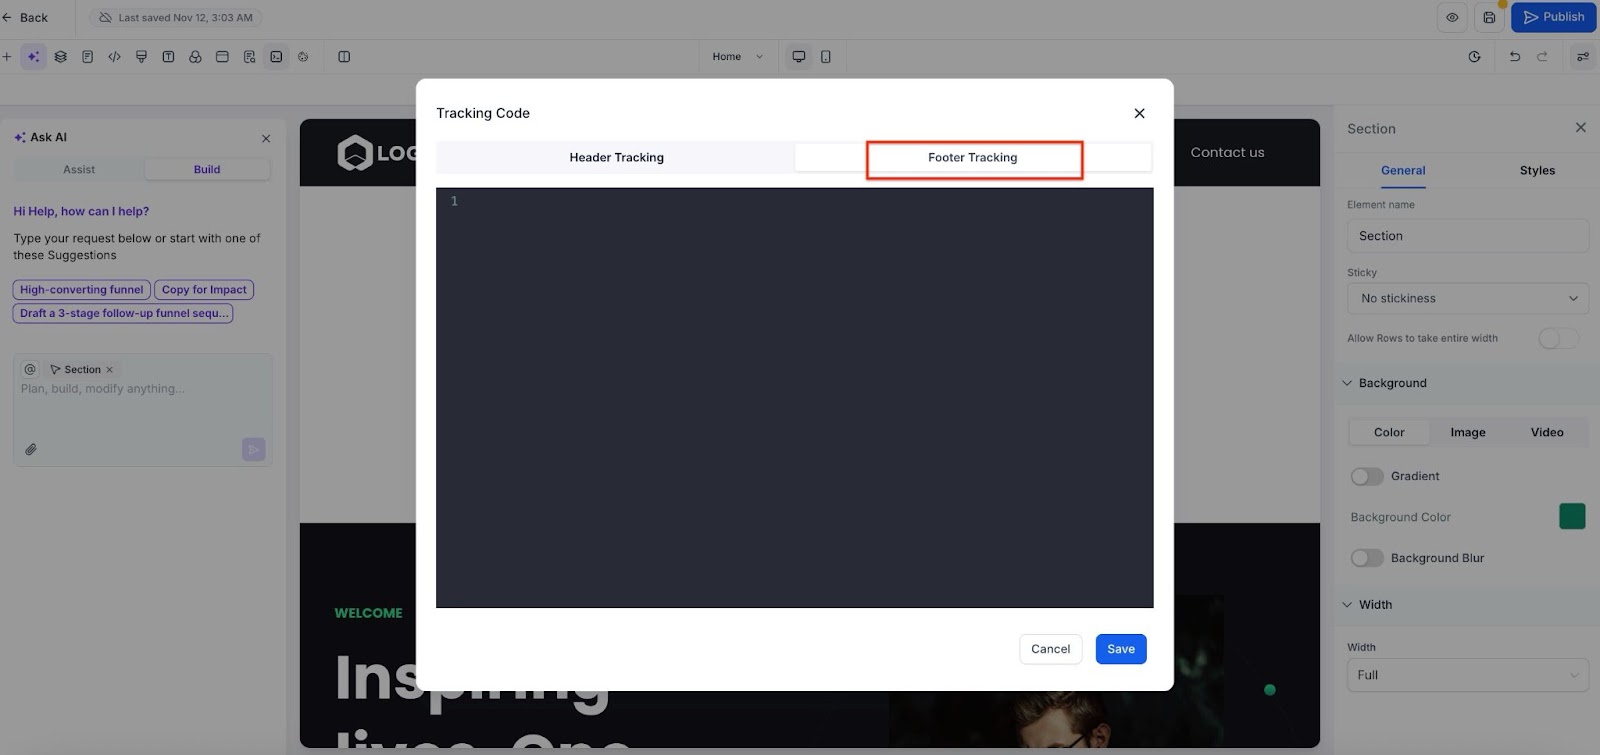
Step 4: Add Tracking Code to Your Page
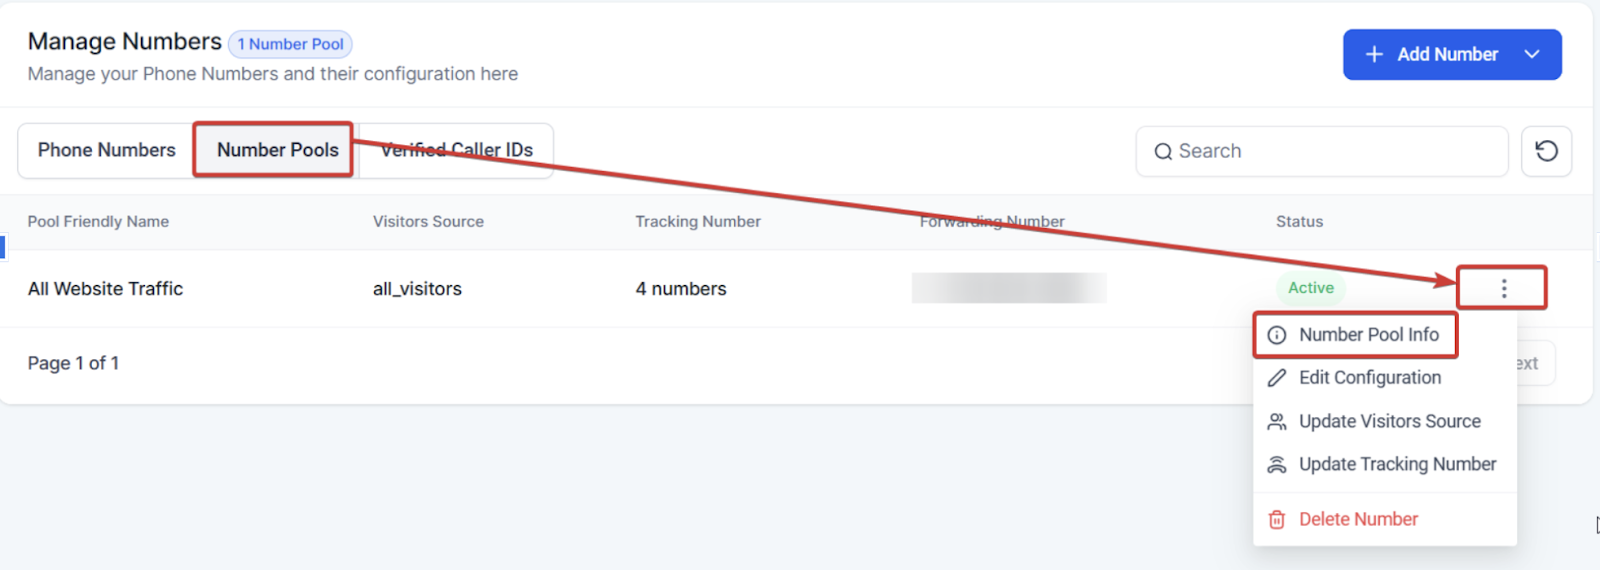
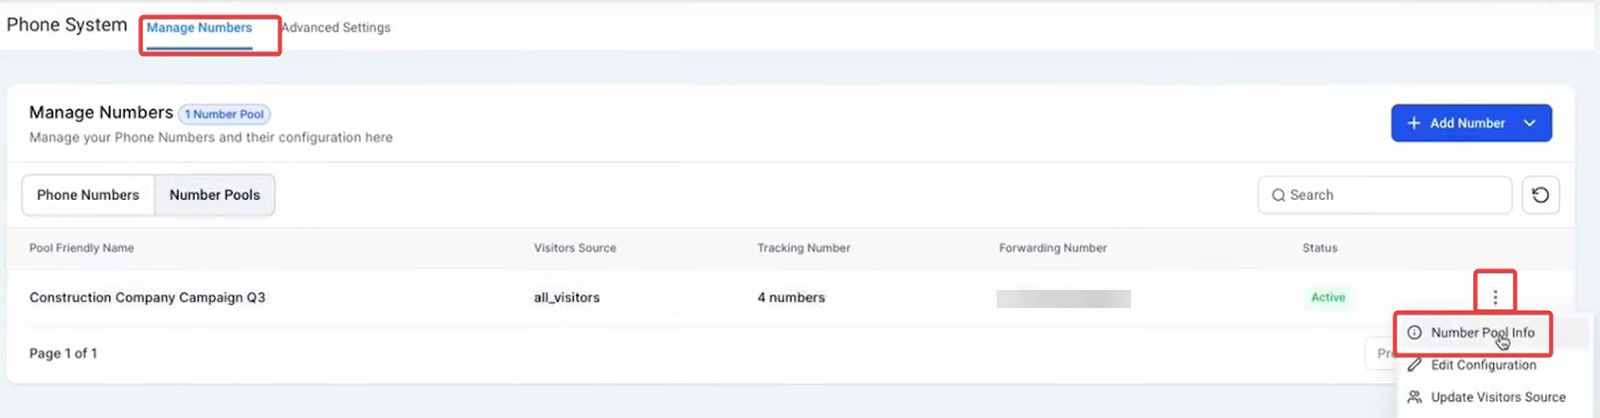
- Click the information icon next to your Number Pool.
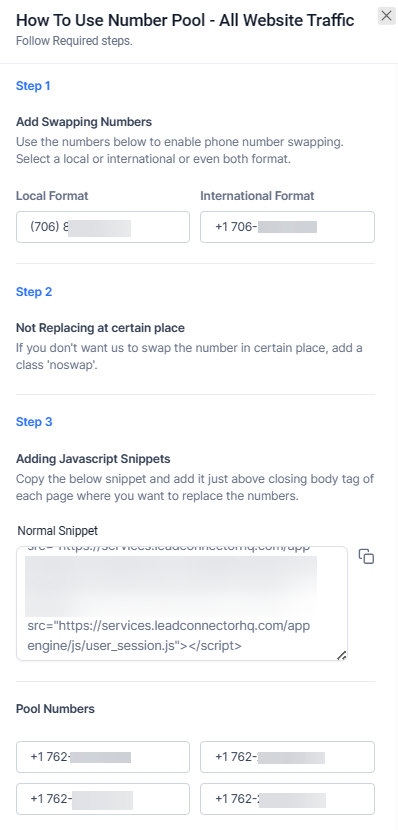
- Copy the 'Normal Snippet' from the popup.
- Navigate to the funnel or website where the number pool will be used.
- Go to 'Settings' and paste the Normal Snippet into the tracking code section, under any existing code.
- Save to apply the changes.

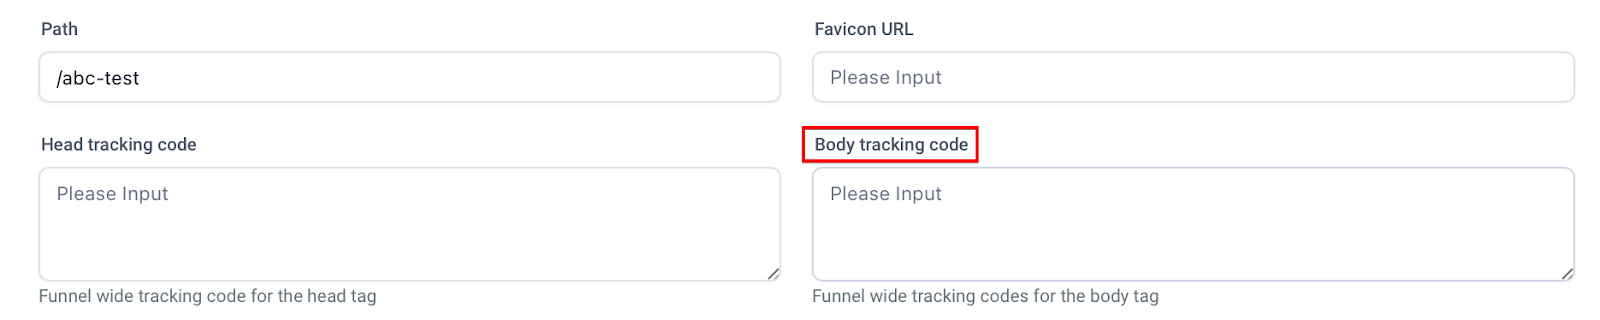
- For specific page tracking, paste the snippet in 'Settings > Tracking Code > Footer Code' on the desired page.

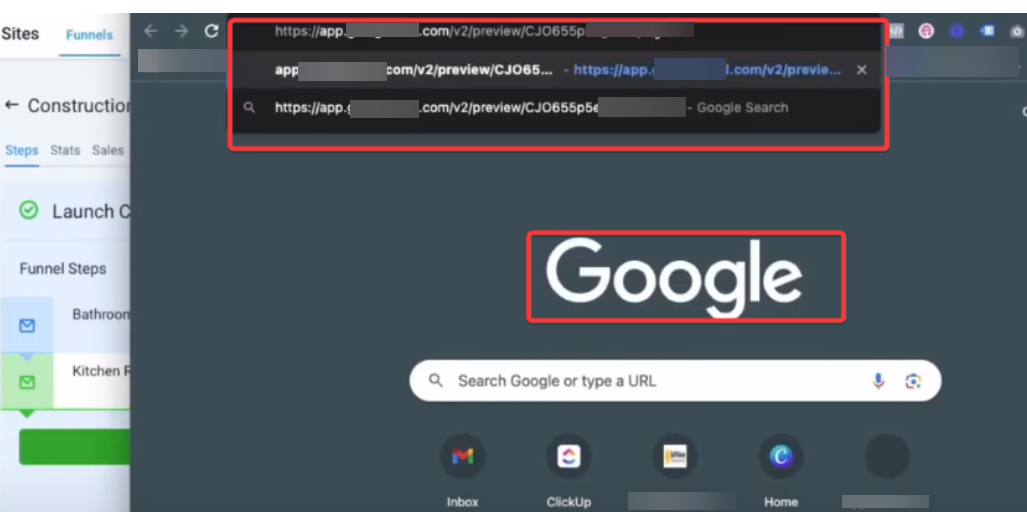
Step 5: Testing Your Number Swapping
- Test the number-swapping feature by visiting the URL in an incognito browser window
Step 6: Setting up Keyword Tracking
- Add '?keyword-={keyword}' to your Google Ad URL to display the searched keyword before a call.
- For example: Change thedemoaccount.com/landingpage to thedemoaccount.com/landingpage/?keyword={keyword}.
FAQs
Question: What is call tracking, and why is it important for my business?
Answer:
- Call tracking is a tool that helps businesses understand the origins of their incoming calls, whether from email blasts, Facebook ads, Google ads, or other marketing efforts. By using number pools in Mastermind, you can enhance your understanding of call sources, optimize your lead generation strategies, and measure the effectiveness of your marketing campaigns.
Question: How do I create a Number Pool in Mastermind for call tracking?
Answer:
- To create a Number Pool:
- Go to Settings > Phone Numbers and select the option to add a new Number Pool.
- In the popup, choose either 'Track visitor activity' (for tracking multiple sources) or 'Track a marketing campaign' (for a specific campaign).
- Click 'Create Pool' and configure your Number Pool by naming it, deciding on the number of phone numbers, setting the 'Forward Calls To' number, and choosing whether to use the 'Swapping Number' feature.
- Confirm the purchase of additional numbers and click 'Next: Tracking Options' to finalize.
Question: What are the different types of tracking numbers I can create in a Number Pool?
Answer:
- There are three types of tracking numbers you can create:
- Local Numbers: These are tracking numbers that are local to your business's existing number, ideal for maintaining a local presence.
- Toll-Free Numbers: These are useful for businesses looking to offer customers free calls and project a national presence.
- Area Code-Specific Numbers: These numbers can be from any area code, allowing businesses to target specific geographic markets or create a local presence in areas where they are not physically located.
Question: How do I display a call tracking number on a funnel page?
Answer:
- To display a call tracking number on a funnel page:
- Obtain a call tracking number from Mastermind, choosing a local, toll-free, or specific area code number.
- Set up the number’s call forwarding, recording options, and whisper messages in the Mastermind.
- Copy the tracking code snippet or the actual tracking number and paste it into the funnel’s header or footer code section or within the specific widget designated for phone numbers.
- Test the number display by opening the funnel page in an incognito window to ensure it is displayed correctly.
Question: What are ‘Swapping Numbers’ and how do they work?
Answer:
- 'Swapping Numbers' are the primary numbers on your site, ad, or page, while 'Pool Numbers' are used for tracking calls. The swapping feature dynamically changes the phone number displayed based on the visitor’s source, allowing you to effectively track calls from different marketing channels or campaigns.
Question: How can I test the number-swapping feature on my page?
Answer:
- To test the number-swapping feature, visit the URL where the number pool is set up in an incognito browser window. This helps verify that the correct tracking number is displayed dynamically for different visitors or traffic sources.
Question: What is the purpose of adding '?keyword-={keyword}' to my Google Ad URL?
Answer:
- Adding '?keyword-={keyword}' to your Google Ad URL lets you track which specific keywords triggered a call. For example, changing a URL from 'thedemoaccount.com/landingpage' to 'thedemoaccount.com/landing page/?keyword={keyword}' helps display the searched keyword before a call, enhancing your ability to track and analyze keyword performance.
Question: How do I set up keyword tracking for my call tracking numbers?
Answer:
- To set up keyword tracking:
- Add '?keyword-={keyword}' to your Google Ad URL.
- This modification will enable you to capture and display the keywords searched by the caller, providing insights into which keywords are driving calls to your business.
Question: Can I edit the settings of a Number Pool after it has been created?
Answer:
- Yes, you can edit the settings of a Number Pool after it has been created. Navigate to Settings > Phone Numbers, select the Number Pool you wish to edit, and adjust the settings as needed, including the tracking options, number of phone numbers, and call forwarding settings.
Question: How do I configure call forwarding and other settings for my tracking numbers?
Answer:
- To configure call forwarding and other settings for your tracking numbers:
- Access the call tracking number settings within Mastermind.
- Set the call forwarding destination, enable or disable call recordings, and choose a whisper message (e.g., 'new call from ad campaigns').
- Save your settings and ensure they align with your tracking and marketing goals.
Question: What should I do if I want to track calls from a specific marketing campaign?
Answer:
- To track calls from a specific marketing campaign:
- Choose the 'Track a marketing campaign' option when creating a Number Pool.
- This option allows you to focus on a single, targeted marketing initiative, such as an email blast, to analyze its effectiveness in generating calls and leads.
Question: Are international numbers supported for call tracking?
Answer:
- Availability of international numbers depends on your telephony provider’s supported regions. You can select numbers from specific area codes or countries when setting up your Number Pool, subject to local regulations.
Question: Can I track calls from multiple marketing campaigns simultaneously?
Answer: Yes, you can track calls from multiple marketing campaigns simultaneously by selecting the 'Track visitor activity' option when setting up your Number Pool. This option is designed for businesses that want to monitor several sources of web traffic and marketing channels, including PPC keywords, Facebook ads, Google ads, and more.
Question: What is the difference between "Track visitor activity" and "Track a marketing campaign"?
Answer:
- Track visitor activity: Best for ongoing digital marketing (PPC, SEO, Social Ads). It tracks multiple sources simultaneously to show how various online activities lead to calls.
- Track a marketing campaign: Best for one-off, specific initiatives like a single email blast or a physical flyer, providing concentrated data on that specific effort.