How To Mark Appointment Status as Invalid Using a Workflow
You can update an appointment status based on tags, which may be useful for your business and any automation you are running. Here's a recommended best practice for updating appointment statuses based on tags within a Workflow, specifically related to the Invalid Status.
Key Benefits of Updating Appointment Statuses Based on Tags
-
Automated Workflow for Appointment Management:
By setting up automated workflows for appointment statuses based on tags, you reduce manual effort and ensure consistency across your scheduling system. This streamlines the management of appointments, allowing for more efficient operations.
-
Improved Accuracy in Appointment Tracking:
Automatically assigning appointment statuses based on specific tags ensures that all appointments are accurately categorized without the risk of human error. This makes it easier to track and manage appointments, especially when dealing with large volumes.
-
Enhanced Customer Experience:
The status of appointments to "Invalid" or other specific statuses ensures that customers and staff are on the same page. This prevents confusion and helps in providing timely follow-ups, offering a better experience for clients.
-
Customizable Status:
The workflow can be customized to update appointments to any status, not just "Invalid." This gives you the flexibility to adapt the system to suit your business's specific needs, whether you're managing confirmed, rescheduled, canceled, or other appointment statuses.
-
Increased Efficiency with Tag-Based Automation:
Using tags to trigger status in your workflows allows for more efficient automation. Once the relevant tag is added, the system automatically runs the workflow and the appointment status, reducing the need for manual intervention and saving time.
Part 1: Set up a tag for invalid Appointments.
- Go to Settings > Tags

- Create a tag called "Invalid Appointment".

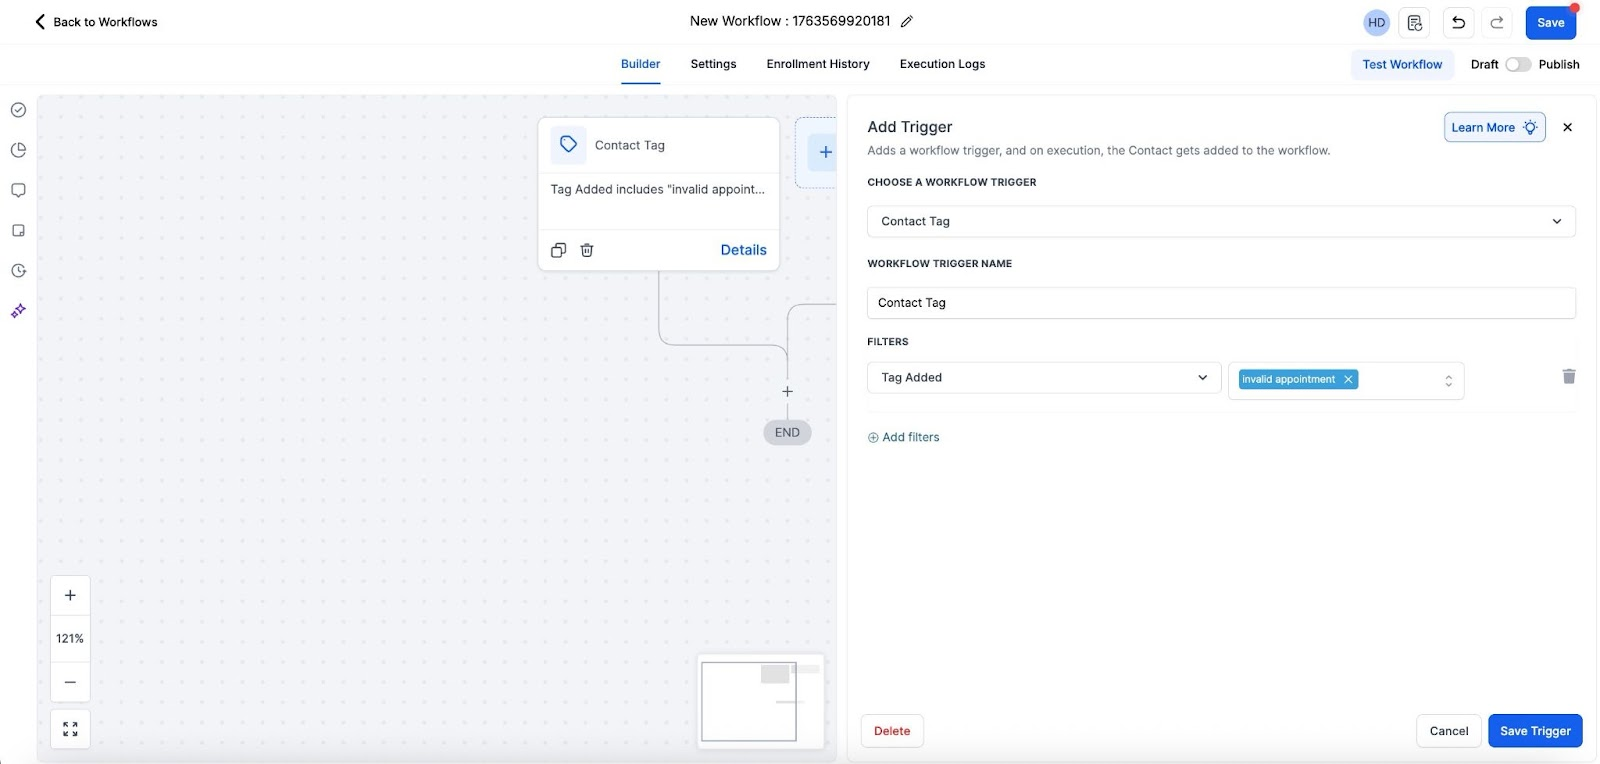
Part 2: Create a tag-based trigger in Workflows.
- Navigate to “Tools & Reporting” > “Automations” > “Workflows”, and create a new Workflow. Click on +Start from Scratch.

-
Add a new Trigger named "Contact Tag," choose the filter “Tag Added,” and then select the "Invalid Appointment" tag you created. Save the trigger.
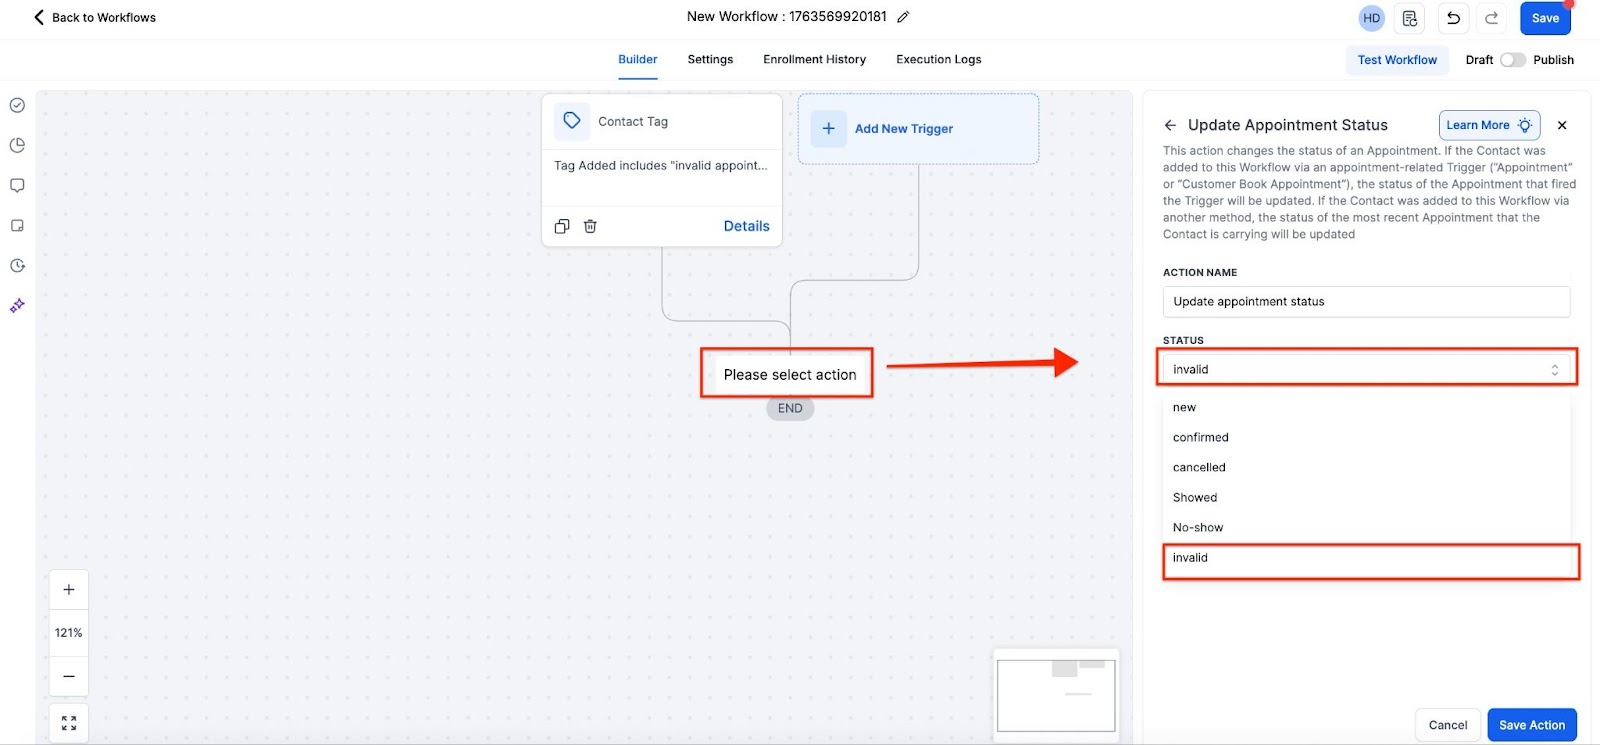
- Step 3: Click on the + Icon to choose the action.


-
For the action, add “Update Appointment Status” and select “Invalid” as the status. Save the Action.
- Step 3: In the top right-hand corner, make the workflow active and save it.


Part 3: Using the Tag and Trigger
- When you have contact with an invalid appointment, add the "Invalid Appointment" tag, and the workflow will run, updating their appointment status to "Invalid".
FAQ
Question: Can I use this workflow to update appointment statuses to other statuses besides "Invalid"?
Answer: Yes, you can customize the workflow to update appointment statuses to any available status by selecting the desired status in the "Update Appointment Status" action.

Question: Can I use multiple tags to trigger different appointment status updates within the same workflow?
Answer: Yes, you can add multiple triggers within the same workflow to handle different tags and corresponding appointment status updates. Each trigger can be set up with its own specific tag and corresponding status action.
Question: How can I test if my workflow for updating appointment statuses is working correctly?
Answer: To test your workflow, manually add the "Invalid Appointment" tag to a contact with an appointment. Check if the appointment status updates to "Invalid" in the contact’s appointment details, confirming that the workflow is functioning as expected.
Question: Will the workflow run automatically if the tag is added through an external system or manually from a contact’s record?
Answer: Yes, the workflow will run automatically whenever the specified tag is added to a contact, whether it’s done manually, through an external system, or via another automation, as long as the workflow is active.
Question: Where do I find the "Update Appointment Status" action in the workflow builder?
Answer: After adding your Contact Tag trigger, click the "+" icon to add a new action, and search for "Update Appointment Status" in the action list. From there, select your desired status.
Question: What happens if the workflow is turned off?
Answer: If the workflow is inactive, adding the tag will not trigger any appointment status changes until the workflow is reactivated.
Question: Do "Invalid" appointments still take up a slot on my calendar?
Answer: Once an appointment is marked as "Invalid," the time slot is released and becomes available for other leads to the book. This ensures your calendar remains open for high-quality appointments.
Question: If I mark an appointment as "Invalid," does it notify the customer automatically?
Answer: No. Changing the status only updates the internal database and releases the calendar slot. If you want the customer to receive a "Cancellation" or "Invalidation" notice, you must add a Send Email or Send SMS action to the same workflow, immediately following the "Update Appointment Status" step.