How To Configure The Buttons on Your Website
In this tutorial, we’ll explain how to configure the buttons for your website. This allows you to determine the action(s) that occur when someone clicks a button on your page, and can be fully customized. For instructions on configuring your navigation menu, skip to Step 3.
Step 1: Getting Started With Button Configuration
-
Go to Marketing & Sales > Funnels & Pages on the left > Websites at the top and select the website you want to make changes to.
- Navigate to the page you'd like to edit.


- Select the button you have already added to configure.
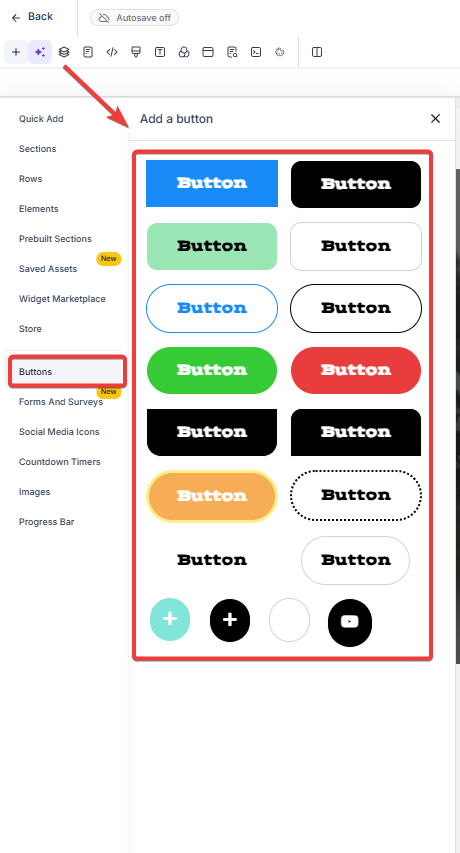
- To add a new button navigate to the left side of the screen to "add elements plus icon” and then click on Buttons
- Select from the list of ready-made buttons.
Step 2: Choose Your Button Actions
- From the “Link To” list, you can choose any of the following options:
- Open popup
- Website URL
- Hide & Show elements
- Scroll to Element
- Go to page
- One-click up/down sell product
- Call
- SMS
- Email address
- Membership
- Download File

- Once you’ve chosen your option for the Button Action from the dropdown, you will need to fill out the remainder of the information needed for that particular action.
- For example, if you choose “Website URL” you will need to enter the specific URL, and toggle on or off the “Open in New Tab” feature:

NOTE: If you choose “Website URL” you can choose a link from a hosted file in your Media Library.
- If you choose “Scroll to element” you will need to select an element, It will highlight the element in your builder which you hover over during your selection:
Tip: When you have a lot of similarly named elements, it helps to name your elements uniquely to find them more easily in this dropdown.
- Entrance and Hover Animations for Buttons
You can also add dynamic entrance and hover animations for buttons. This allows you to apply captivating visual effects to buttons, enhancing user interaction and capturing attention. With options such as fade, slide, bounce, rotate, and zoom, you can animate buttons to create a more visually appealing experience for your audience.
Benefit: These animations activate when elements come into view, ensuring they capture the audience's attention at the right moment.
How to Use: Navigate to the website editor, select the button you wish to animate, and choose from various animation options in the new animations tab. Save and publish your changes to see the effects in action.


Note: The button effects have been relocated from the advanced tab to the animations tab, and all previous settings remain unaffected.
Step 3: (Optional) Navigation Menu Configuration
- Select the page you'd like to edit.
- NOTE: When editing the buttons on a navigation menu, you will need to configure the buttons on each website page.
- Select Navigation Menu.
- Go to "Navigation Menu Settings" on the right-hand side.
- Scroll down to "Menu Items" > Select "Edit" on the button you'd like to configure.
- In the popup, enter the website URL or the page you'd like to assign the button to > Click "Submit".
- Repeat this step for each button.
- Once ALL of the navigation menu buttons have been configured, click "Save" to confirm your updates/changes.
- Repeat steps 1-3 for the remaining pages.
FAQ
Question: Can I add multiple actions to a single button?
Answer: No, each button can only have one action assigned to it at a time. However, you can create multiple buttons for different actions on the same page.
Question: How do I ensure a button link opens in a new tab?
Answer: When selecting the "Website URL" option for your button, you can toggle on the "Open in New Tab" feature to ensure the link opens in a new browser tab.
Question: Can I use custom animations for buttons?
Answer: Yes, you can add entrance and hover animations for buttons, such as fade, slide, bounce, rotate, and zoom, to enhance their visual appeal and engage users.
Question: Do I need to configure navigation buttons for each page separately?
Answer: Yes, navigation menu buttons must be configured individually for each page. You will need to edit each navigation menu on the respective pages to apply the changes.
Question: Can I use a button to trigger a file download, like a PDF or an E-book?
Answer: Yes! In the "Link To" dropdown, select "Download File." You can then choose a file directly from your Media Library. When the user clicks the button, the file will automatically download or open in their browser depending on their settings.
Question: What is the benefit of naming my elements uniquely in the website builder?
Answer: Naming elements uniquely makes it much easier to find them in the dropdown menu when you are configuring a "Scroll to Element" action, especially on pages with many sections.
Question: Can I change a button's color or size without affecting its action?
Answer: Absolutely. Button Styles (color, padding, borders) and Button Actions (where it links) are managed separately. You can completely redesign your button's appearance at any time; as long as you don't change the "Link To" settings, the functionality will remain the same.