How to Send a Test Email and SMS
You may want to send a test email to yourself, or perhaps you want to run yourself through Mastermind using a workflow as a test/trial run. Both are easy to do and yet slightly different.
The best practice is to run yourself through the workflow as the most thorough and accurate way to experience what your lead will see through those workflow actions. If you just send a test email or SMS through the builder some of the custom values may not populate and as such, it will appear that your email/SMS isn't working how you want it to. Giving yourself a test run through the workflow is a great way to do a quality audit.
Part 1:
How can I test a workflow as a contact to ensure it functions correctly?
Step 1: Go to Your Customers > Contacts and add yourself as a contact (Use a different email address and phone number than the one for your user login).
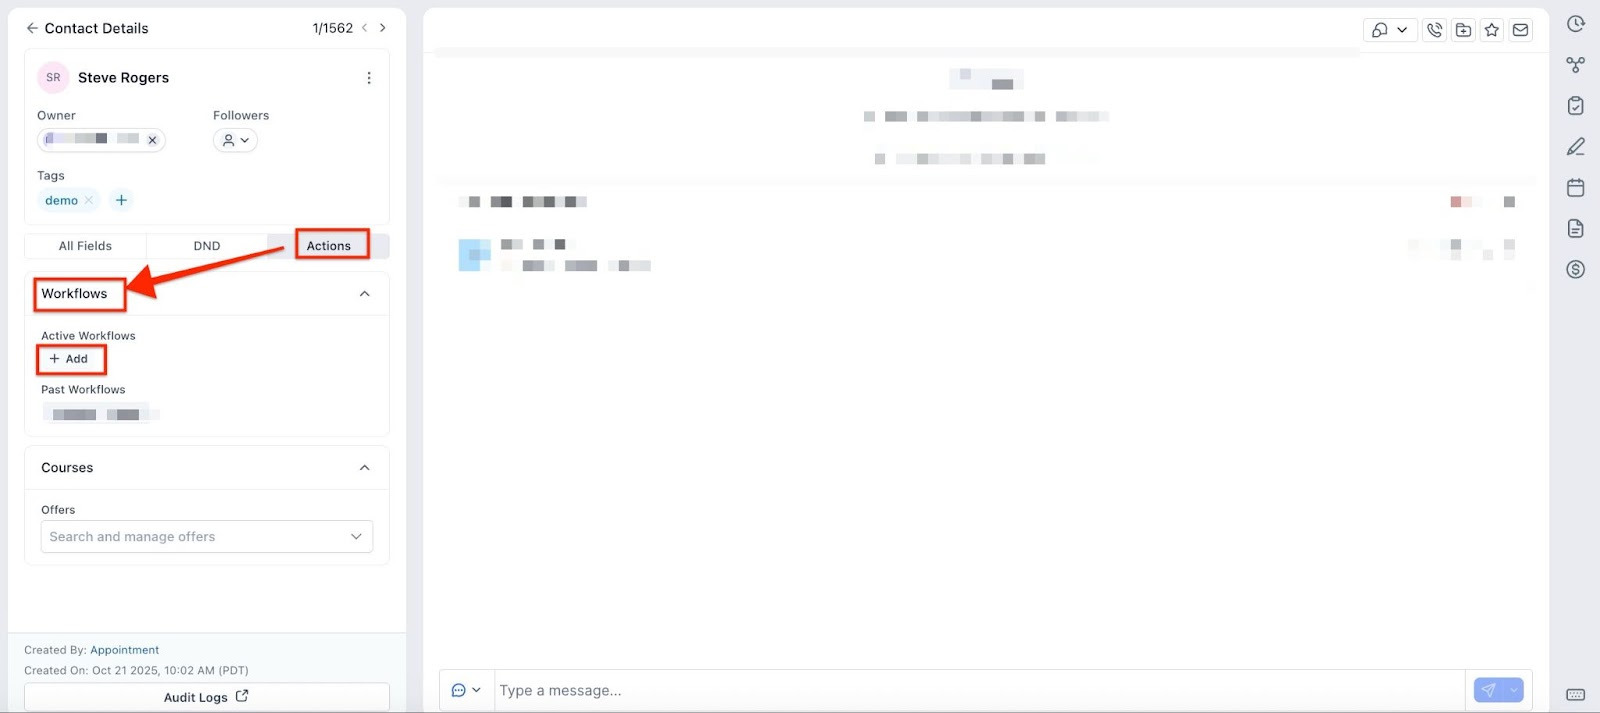
Step 2:
Click the + button to add the contact to the desired workflow
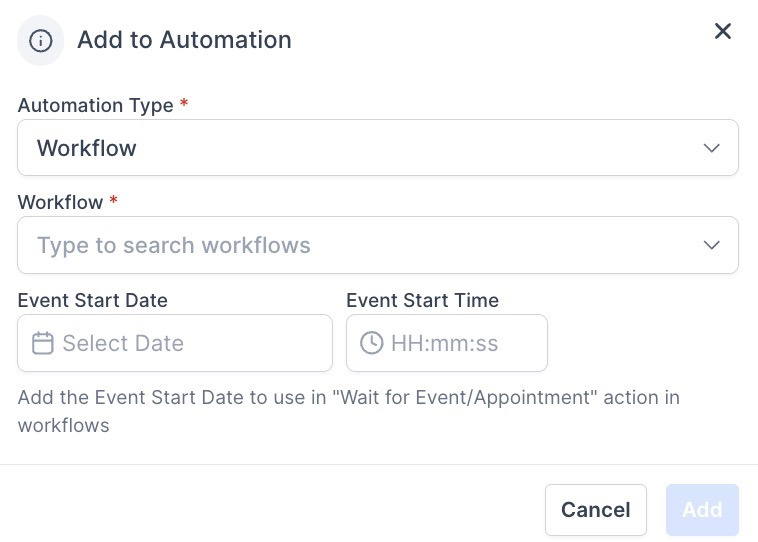
Click the add workflow button, choose the workflow you want to test, leave the “event date” blank then hit the add button.
NOTE: If you don’t get the communication, check the following items in the following order:
- Is your workflow set to “Published”? If not, Publish it and re-run the workflow (ensure that ‘Allow Multiple’ is enabled).
- If you go to your Test Contact, does it show that the communication went out? If yes, look at #3 and #4. If no, look at #1.
- If you aren’t getting SMS messages, check that you have set up your phone number.
- If you aren’t getting emails, check that you have set up your SMTP provider.
Part 2. How can I send a test email in the email builder to preview my template?
Step 1: Go to Marketing & Sales > Email and Social Media > Emails > select Templates and select the email template you wish to test.
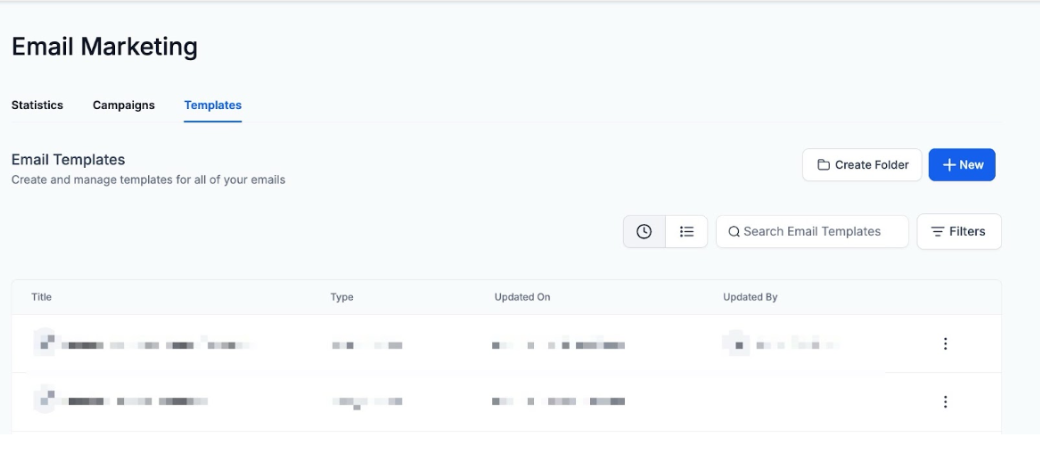
Step 2: Select the three dots on the top right and select “Test Email”

Step 3: Enter in the from address, “to” field, and email subject line, It also provide support for sender names and preview texts in test emails. This enhancement allows users to preview emails more accurately before finalizing them for distribution.


Step 4: Select “Send Test Email”
Please note that custom values may not properly fill in the test email (for example: {contact.email} may show as blank.)
Q: Why am I receiving an error when sending a test email, and how can I fix it?
A.: When testing a campaign email, you may receive a popup notification with an error message that states "An error occurred, please try again." The message will look like this:

Check the following to ensure your email test can send:
- Ensure the custom values being used are valid. Be sure that custom values have proper brackets {{ }} (not just 1 {} or more than 2 {{{}}}). For example, {{contact.name}} or {{contact.city}}.
- Check the email address to ensure it follows proper format such as test@emaildemo.com
Q: Why do I see an error message when trying to send a test email?
A: Error messages indicate specific issues. Click the error icon to view details.
How to troubleshoot common errors:
- If the error mentions authentication issues, verify that your email settings and credentials are correct.
- If the error mentions DNS records, check that your SPF, DKIM, and DMARC records are correctly configured.
- If the error suggests rate limits, wait and retry or adjust sending limits in your email provider settings.
Fix: If the error remains unclear, contact your email service provider for detailed logs and troubleshooting.
Q: The test email was sent, but I didn’t receive it. What should I do?
A: If the email is sent but not received:
- Check your Spam or Junk folder.
- Confirm that the test email address is correct and active.
- If using a custom domain, ensure proper DNS records (SPF, DKIM, and DMARC) are set up.
- Verify your email provider’s sending limits; some limit test emails.
Fix: Try sending to a different email provider (e.g., Gmail or Outlook) to rule out a provider-specific issue.
Q: The test email isn't sending. What should I check?
A: If the email isn't sending, follow these steps:
- Ensure you have a verified sender email configured in Settings > Email Services.
- Check if your email service provider allows outgoing test emails.
- Look for any error messages next to the email in "Your Customers" > "Inbox".
- If an error appears, click on it to view the full details.
Fix: If the error suggests a domain issue, update your sender email settings or consult your email service logs for more details.
FAQ’s
Question: Why should I run myself through a workflow instead of just sending a test email?
Answer: Running yourself through the workflow gives you a more accurate experience of what your lead will see, including how custom values populate. Sending a test email or SMS through the builder may not properly fill in custom values, leading to potential issues being overlooked.
Question: How do I run myself through a workflow as a test?
Answer:
- Go to the Contacts section and add yourself as a contact (using a different email address and phone number than your user login).
- Click the “Add Workflow” button, choose the workflow you want to test, leave the “event date” blank, and then click the “Add” button.
Question: What should I check if I don’t receive the communication when testing a workflow?
Answer:
- Is your workflow published? Ensure it’s set to “Published” and that “Allow Multiple” is enabled.
- Does your Test Contact show that the communication was sent? If yes, check the SMS/Email setup.
- If not receiving SMSs: Verify that your phone number is correctly set up.
- If not receiving emails: Check that your SMTP provider is correctly configured.
Question: How do I send a test email using the email builder?
Answer:
- Go to Marketing & Sales > Email & Social Media > Templates and select the email template you want to test.
- Click the three dots on the top right and select “Test Email.”
- Enter the “from” address, “to” field, and email subject line. You can also add a sender name and preview text.
- Click “Send Test Email.”
Question: Why aren’t custom values populating in my test email?
Answer: Custom values may not fill in correctly during a test email. For example, {contact.email} could show as blank. This is why running yourself through the full workflow is recommended for a more accurate test.
Question: Why should I leave the "event date" blank when testing a workflow as a contact?
Answer: Leaving the "event date" blank ensures that the workflow runs immediately, without any scheduling delay. This helps in quickly testing the communication process, allowing you to see the workflow's actions in real-time.
Question: Can I test SMS messages the same way as emails?
Answer: Yes, but ensure your phone number is properly configured and SMS delivery is enabled in your workflow setup.
Question: The test email isn’t sent. What should I check?
Answer:
- Verify you have a verified sender email configured in Settings > Email Services.
- Check if your email service provider allows outgoing test emails.
- Look for any error messages in the Conversations tab and click for full details.
Question: Why do I need to use a different email/phone than my "User Login" for testing?
Answer: The system often recognizes your Admin/User login and may treat it differently than a "Lead" or "Contact." Using a personal email (like a Gmail or Yahoo account) ensures the system treats you as a fresh lead, providing a 100% accurate representation of the customer journey.
Question: Can I send a test email to 10 people at once from the builder?
Answer: The "Test Email" tool is designed for quick individual previews. To test how an email looks for a group, it is better to create a "Test" tag for those 10 contacts and add that tag as a trigger for your workflow.