How to Export Contacts from ActiveCampaign
Exporting your contacts from ActiveCampaign is a straightforward process that allows you to back up your data, analyze it outside the platform, or share it with others. This guide will walk you through each step to ensure your contact data is exported correctly.
Step 1: Access the Contacts Section
- Log in to Your ActiveCampaign Account:
- Begin by logging into your ActiveCampaign account using your credentials.
- Navigate to Contacts:
- On the left-hand menu, click Contacts to access your contact list.
Step 2: Start the Export Process
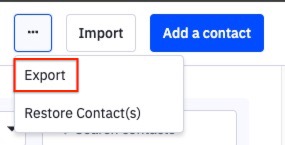
- Open the Export Options:
- In the Contacts section, locate the ellipsis (...) at the top right corner of the page.
- Click the ellipsis to open a dropdown menu, then select Export.
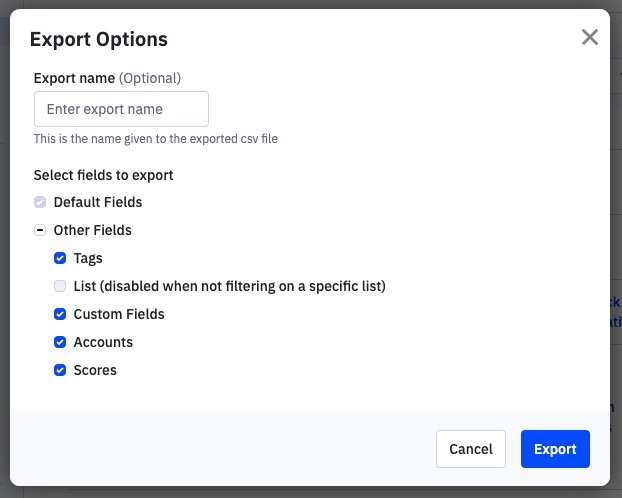
- Configure Your Export:
- An Export Options modal window will appear:
- Optional: Provide a name for your export. Avoid using special characters (e.g., !, #, $, etc.) as these can cause the file to export as a text document rather than a CSV.
- Select the fields you want to include in the export by checking the relevant boxes.
- To select or unselect additional fields, click the Other fields checkbox.
- An Export Options modal window will appear:
- Initiate the Export:
- After configuring your export settings, click Export to begin the process.
Step 3: Download the Exported File

- Monitor the Export:
- The export will run in the background, and a confirmation message will appear at the top of the page once the export is complete.
- You can safely navigate to other pages, log out, or close your browser while the export is in progress.
- Access the Export File:
- Once the export is finished, you can download the file in two ways:
- Click the link in the confirmation message that appears at the top of the page.
- Alternatively, navigate to Contacts > Exports and click the Download link under the Actions column next to your export.
- Once the export is finished, you can download the file in two ways:
- Note on Download Link Validity:
- The download link will remain active for 7 days. Be sure to download your file within this timeframe to avoid needing to repeat the export process.
Additional Tips:
- File Format: Ensure that the export file is in the desired format (usually CSV) for easy use in spreadsheet programs or other data analysis tools.
- Data Security: Store your exported contact data securely, especially if it contains sensitive information.
Click Contacts on the left menu.
Click the ellipsis (...) at the top right.

Click "Export."
An "Export Options" modal window will appear:
Optional: Provide the export name. Do not use special characters (!, #, $, etc.) when naming your export. If you use special characters, the file will export as a text document, not a CSV
Click the fields you want to include in the export
Clicking the "Other fields" checkbox will select or unselect fields
Click "Export"
The export will run in the background, and a confirmation message will appear at the top of the page. You can safely navigate to a different page in your account, log out, or close your browser.
Once the export is done, Click the link in the confirmation message or click "Contacts" > "Exports."
Click the "Download" link under the "Actions" column for the export.
Note that this link will be valid for 7 days.